本文主要介绍使用ubuntu上一些快捷键的配置,用作平衡多个发行版之间的使用系统下的使用习惯。如果适合大家的可以随时取走
禁用gnome-shell应用快捷启动
默认情况下,ubuntu系列的发行版会默认设置super+N来快捷启动应用程序,而本人系统使用super+N来实际切换工作区,启动应用程序的事情完全可以交给应用程序启动器。 所以第一步就需要禁用ubuntu默认预设的值
apt install dconf-editor
首先,通过排查,知道了快捷键的预设来自于gnome-shell,所以找到如下
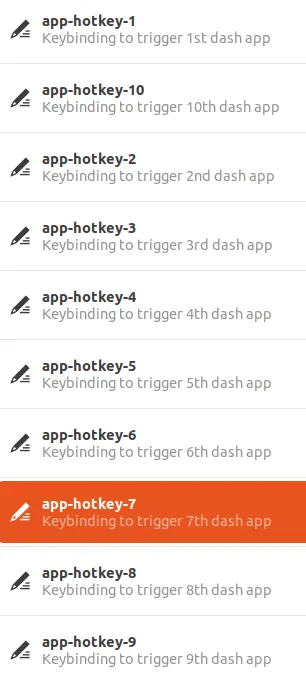
以其中一个举例,可以看到默认设置的是Super+3启动dash上的第3个应用,即文件管理器。
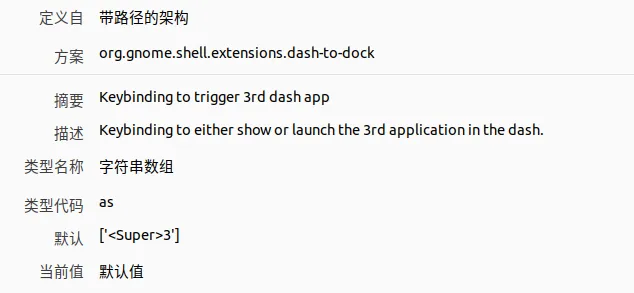
从左侧可以看到3对应文件夹程序

这里为了照顾自己的使用习惯,我需要先禁用super+N启动dash app的快捷键。这里修改值为 [] 即可
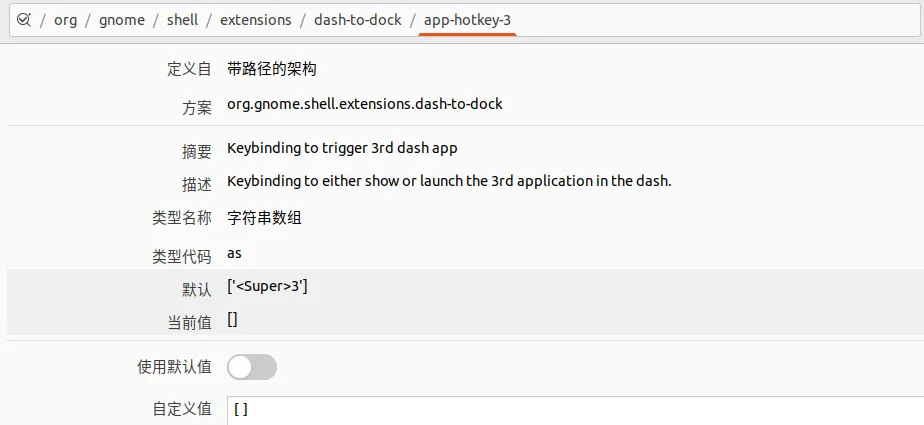
同样的,需要给app-hotkey-1到app-hotkey-10都设置成[]来禁用
设置Super+N为切换工作区
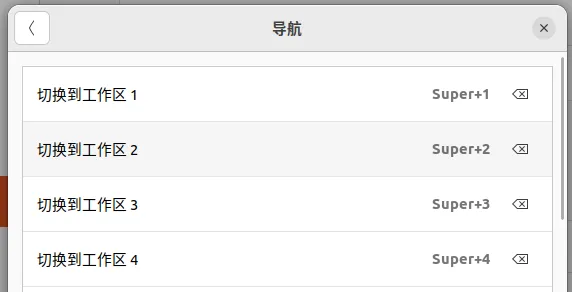
此时我们按照步骤打开如下
设置--->键盘--->查看及自定义按键--->导航
将切换到工作区1-4设置为Super+1/4即可,如下
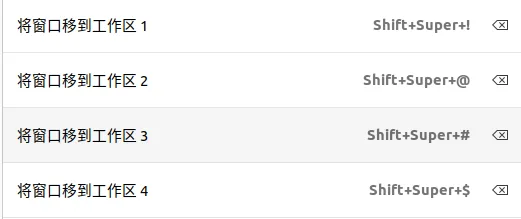
设置Super+Shift+N为将窗口移动到工作区
同样的,也要设置一个快捷键将窗口移动到工作区,如下
设置默认的工作空间
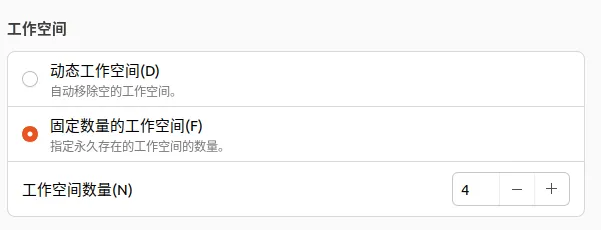
我们看到ubuntu默认设置里面预设的最大就是4个工作区,所以我们也没必要像hyprland一样无限工作区了。所以设置为4个即可。如下步骤
设置--->多任务--->工作空间
这里设置为固定数量的工作空间即可,值为4
命令修改
上面通过UI能够完成修改,为了方便,这里整理了命令一键修改,直接配置,如下。
# 设置super+N切换四个工作区
gsettings set org.gnome.desktop.wm.keybindings switch-to-workspace-1 "['<Super>1']"
gsettings set org.gnome.desktop.wm.keybindings switch-to-workspace-2 "['<Super>2']"
gsettings set org.gnome.desktop.wm.keybindings switch-to-workspace-3 "['<Super>3']"
gsettings set org.gnome.desktop.wm.keybindings switch-to-workspace-4 "['<Super>4']"

# 设置super+shift+N移动应用到工作区
gsettings set org.gnome.desktop.wm.keybindings move-to-workspace-1 "['<Shift><Super>exclam']"
gsettings set org.gnome.desktop.wm.keybindings move-to-workspace-2 "['<Shift><Super>at']"
gsettings set org.gnome.desktop.wm.keybindings move-to-workspace-3 "['<Shift><Super>numbersign']"
gsettings set org.gnome.desktop.wm.keybindings move-to-workspace-4 "['<Shift><Super>dollar']"


# 设置固定数量的工作空间
gsettings set org.gnome.mutter dynamic-workspaces false
gsettings set org.gnome.desktop.wm.preferences num-workspaces 4

# 禁用gnome-shell预设的super+N启动应用
for i in $(seq 1 10); do
    gsettings set org.gnome.shell.extensions.dash-to-dock app-hotkey-$i "[]"
done
总结
这样就解决了自己在切换多个发行版的时候的使用习惯不一致的问题。方便开发。
为了深入和全面的了解学习和开发嵌入式AI相关知识,我拿到了一块orin nano 开发板,接下来会在工作之余,逐渐从零开始orin系列的零基础上手技术文章,主要目的是记录这部分的知识。
本文主要是介绍orin的开箱和烧录。
开箱
官方购买的orin nano super是无任何配件的,就单纯的机器和电源。所以还需要准备如下配件
- sd卡: 我这里备了64G大小的sd卡
- ssd: 我这里备了1T的nvme ssd
- type-c线: 烧录和调试需要这根线
- 网线
- 3.3V串口: 内核及以下必备
- dp转hdmi接口: nano默认是dp接口,而我的设备都是hdmi接口
其他可能还需要camera,mic等,这些后面用到了再买吧
安装
上述配件准备并安装完成之后,就可以开始烧录安装了。
目前最新的烧录只有ubuntu2004和ubuntu2204上才能支持,所以需要给自己电脑装个ubuntu系统,我这里安装的是ubuntu2204
这里选择deb包下载,如果第一次进入,需要注册账号后下载并安装,可以获得如下文件,安装即可
dpkg -i sdkmanager_2.3.0-12617_amd64.deb
apt install -f
安装完成之后,打开此程序,如下
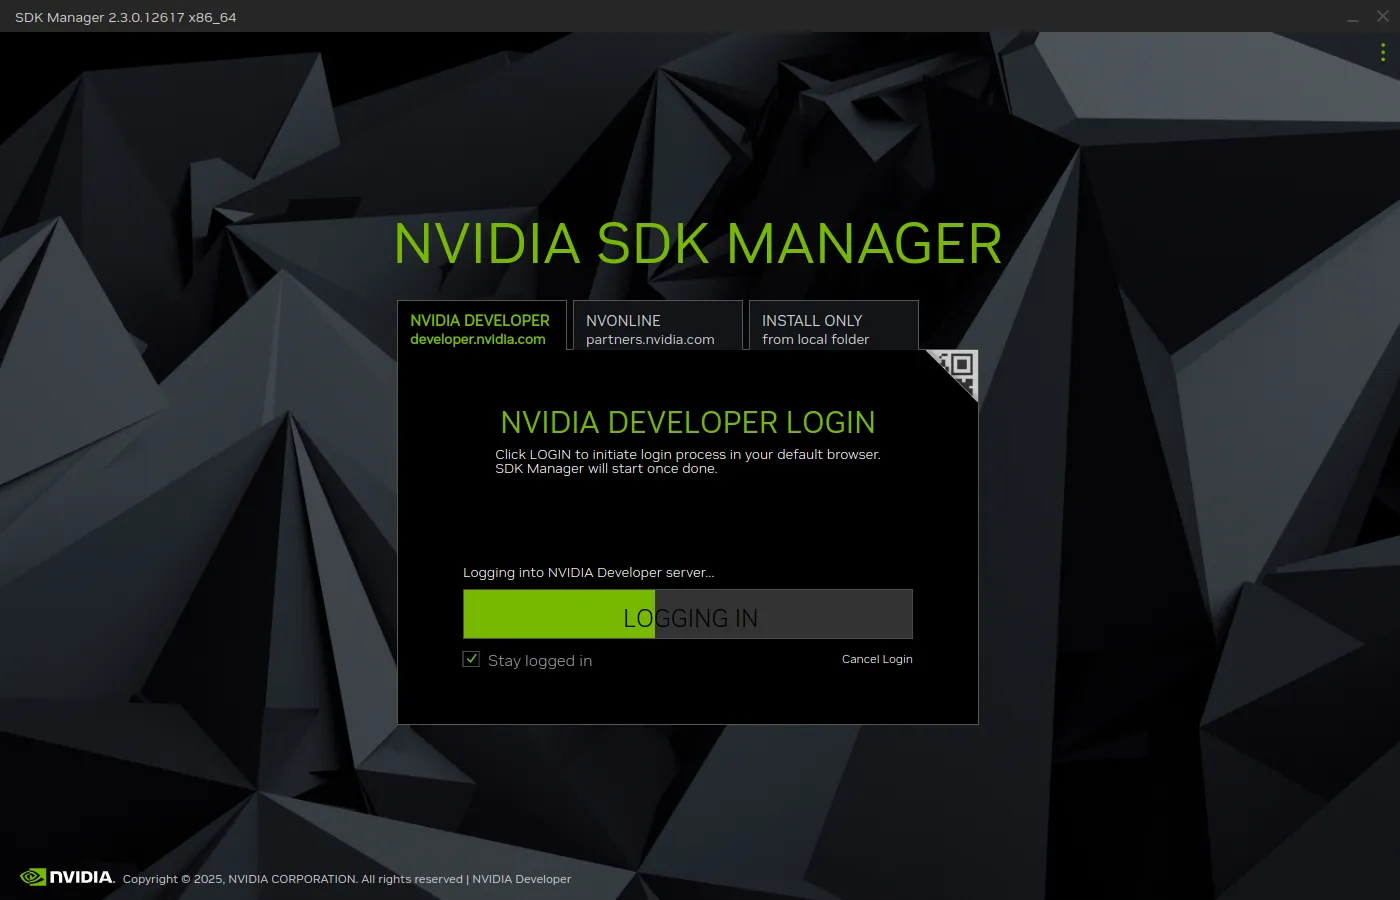
此时需要先完成账号的登陆,完成之后,如下所示

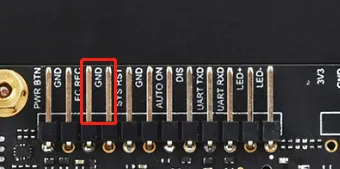
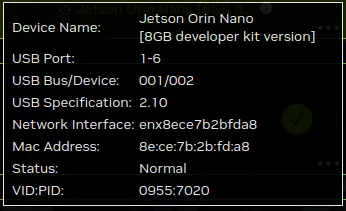
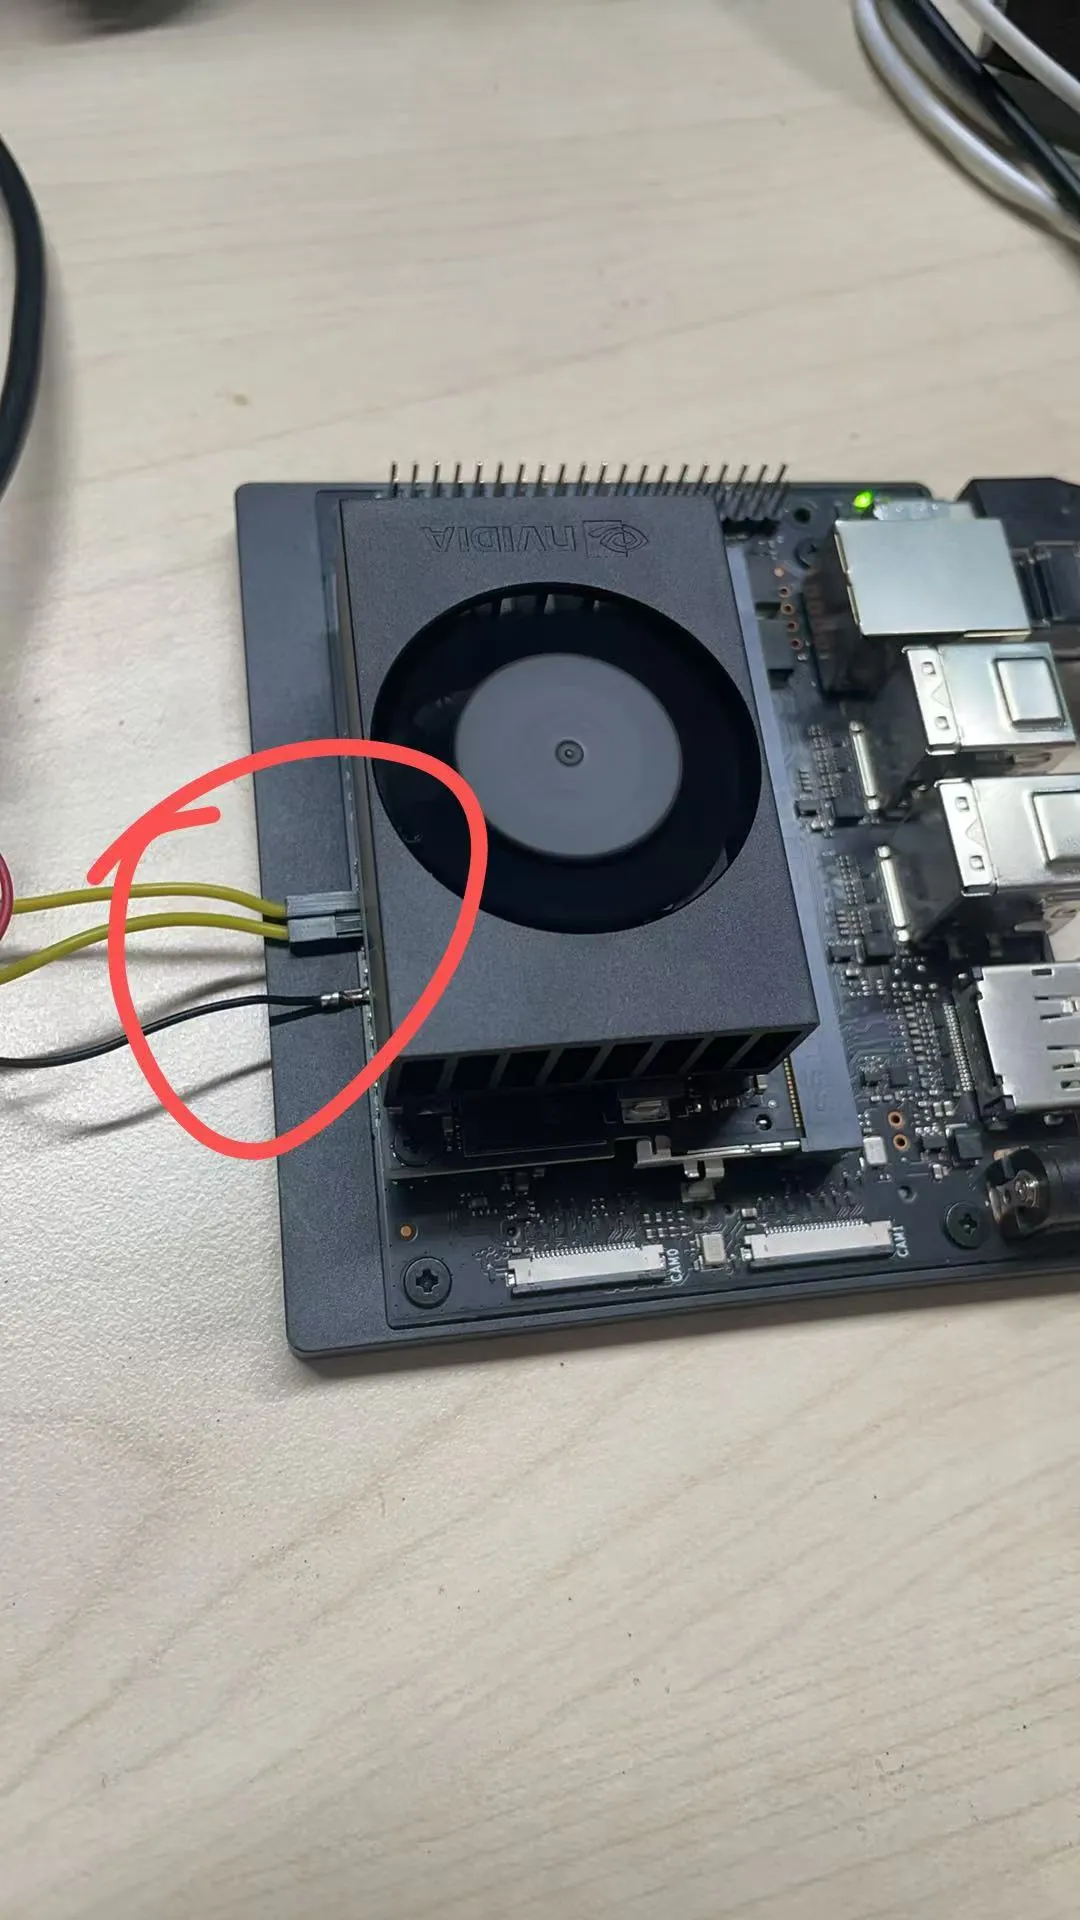
此时对于机器,需要将FC REC和GND短接(从左往右数第3,4脚),让其进入恢复模式,上电开机,即可识别设备如下
可以看到,这里选择的机器是“Jetson Orin Nano 8GB develoer kit version”, jetpack最新只能选择6.2.1。其他不用额外选择
点击continue之后,如下所示
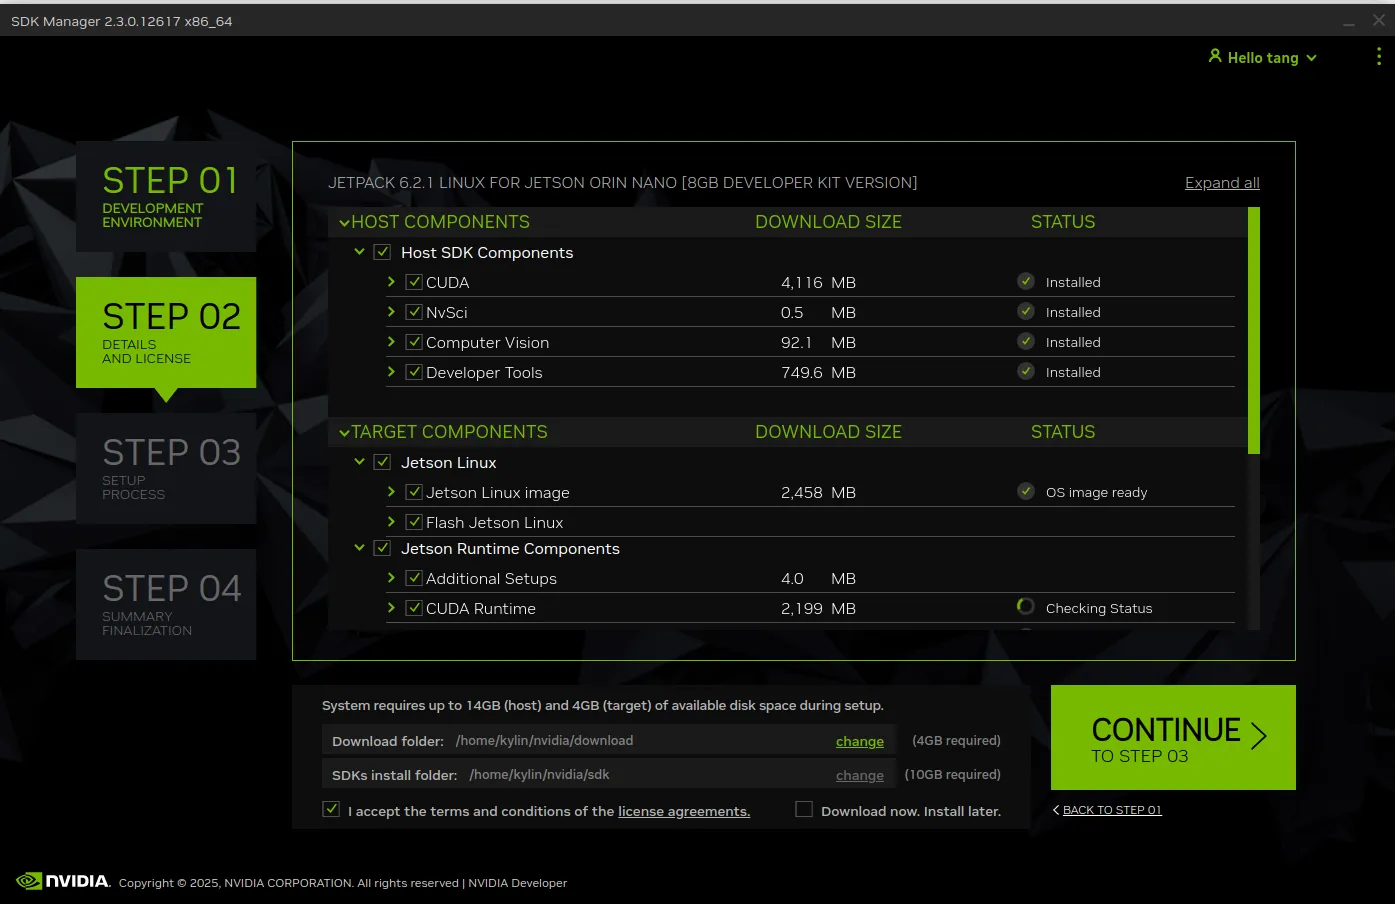
这里仍按照默认选择,唯一额外需要做的是选中下面的接受条款
然后就是一直等待下载,下载完了之后,直接会弹出选项,提示安装位置,这里我选择为安装到nvme上即可

然后继续等待所有的安装完成。
值得注意的是,国内我们一定会在最后安装 docker 容器的时候安装失败,如下提示

此时我们不用关心“Nvidia Container Runtime”的失败问题,后续想办法安装。其他的选项均正常安装即可。
启动
上述安装完成之后,将FC REC和GND短接的杜邦线去掉,重新开机,等待一会儿,我们可以先从type-c的共享网卡中登录进去,如下
$ ssh kylin@192.168.55.1
kylin@192.168.55.1's password:
kylin@ubuntu:~$
这里配置一下自动登录
vim /etc/gdm3/custom.conf
AutomaticLoginEnable = true
AutomaticLogin = kylin
换源可以参考
# 默认注释了源码镜像以提高 apt update 速度,如有需要可自行取消注释
deb https://mirrors.tuna.tsinghua.edu.cn/ubuntu-ports/ jammy main restricted universe multiverse
deb-src https://mirrors.tuna.tsinghua.edu.cn/ubuntu-ports/ jammy main restricted universe multiverse
deb https://mirrors.tuna.tsinghua.edu.cn/ubuntu-ports/ jammy-updates main restricted universe multiverse
deb-src https://mirrors.tuna.tsinghua.edu.cn/ubuntu-ports/ jammy-updates main restricted universe multiverse
deb https://mirrors.tuna.tsinghua.edu.cn/ubuntu-ports/ jammy-backports main restricted universe multiverse
deb-src https://mirrors.tuna.tsinghua.edu.cn/ubuntu-ports/ jammy-backports main restricted universe multiverse

# 以下安全更新软件源包含了官方源与镜像站配置,如有需要可自行修改注释切换
deb http://ports.ubuntu.com/ubuntu-ports/ jammy-security main restricted universe multiverse
deb-src http://ports.ubuntu.com/ubuntu-ports/ jammy-security main restricted universe multiverse

# 预发布软件源,不建议启用
# deb https://mirrors.tuna.tsinghua.edu.cn/ubuntu-ports/ jammy-proposed main restricted universe multiverse
# deb-src https://mirrors.tuna.tsinghua.edu.cn/ubuntu-ports/ jammy-proposed main restricted universe multiverse
这里我们得到了调试的第一种途径,那就是通过type-c的usb_f_rndis功能,共享网卡来进行调试。
配置网卡
接下来需要利用第二种调试方式,网口。
默认情况下,nvidia提供的系统不支持netplan,所以需要安装如下
apt install netplan.io
然后我们直接修改配置如下
vim /etc/netplan/01-kylin.yaml
这里个人还是推荐静态ip还是好一点,动态ip得自己记ip。 下面配置按照静态ip配置,如下
network:
  version: 2
  renderer: networkd
  ethernets:
    enP8p1s0:
      dhcp4: no
      addresses:
        - 172.25.83.92/24
      routes:
        - to: default
          via: 172.25.80.1
      nameservers:
        addresses:
          - 114.114.114.114
保持退出之后,应用网络即可
netplan apply
此时可以通过ssh网卡ip登录,如下
$ ssh kylin@172.25.83.92
kylin@172.25.83.92's password:
kylin@ubuntu:~$
配置vnc
然后是第三种调试方式,vnc。 这里默认安装vino,如下
apt install novnc vino websockify novnc
此时默认情况下 vino 和 ubuntu 的控制面板都不允许登录,所以需要稍微配置如下
gsettings set org.gnome.Vino require-encryption false
gsettings set org.gnome.Vino prompt-enabled false
gsettings set org.gnome.desktop.remote-desktop.vnc enable true
gsettings set org.gnome.desktop.remote-desktop.vnc auth-method 'password'
这里为了xorg默认在没插入显示器的情况下显示正常,需要配置一个dummy显示器,如下
apt install xserver-xorg-video-dummy
配置如下
vim /usr/share/X11/xorg.conf.d/99-dummy.conf
Section "Device"
    Identifier  "Configured Video Device"
    Driver      "dummy"
    VideoRam 256000
EndSection

Section "Monitor"
    Identifier  "Configured Monitor"
    HorizSync 10.0-300
    VertRefresh 10.0-200
EndSection

Section "Screen"
    Identifier  "Default Screen"
    Monitor     "Configured Monitor"
    Device      "Configured Video Device"
    DefaultDepth 24
    SubSection "Display"
    Depth 24
    Modes "1920x1080"
    EndSubSection
EndSection
此时重启gdm 如下
systemctl restart gdm
xrandr
Screen 0: minimum 320 x 175, current 1920 x 1080, maximum 1920 x 1080
default connected primary 1920x1080+0+0 0mm x 0mm
我们在nano上开启vino,如下
systemctl restart vino-server --user
然后在ubuntu2204的x84机器上安装vnc client并连接,如下
apt install vinagre
此时连接即可
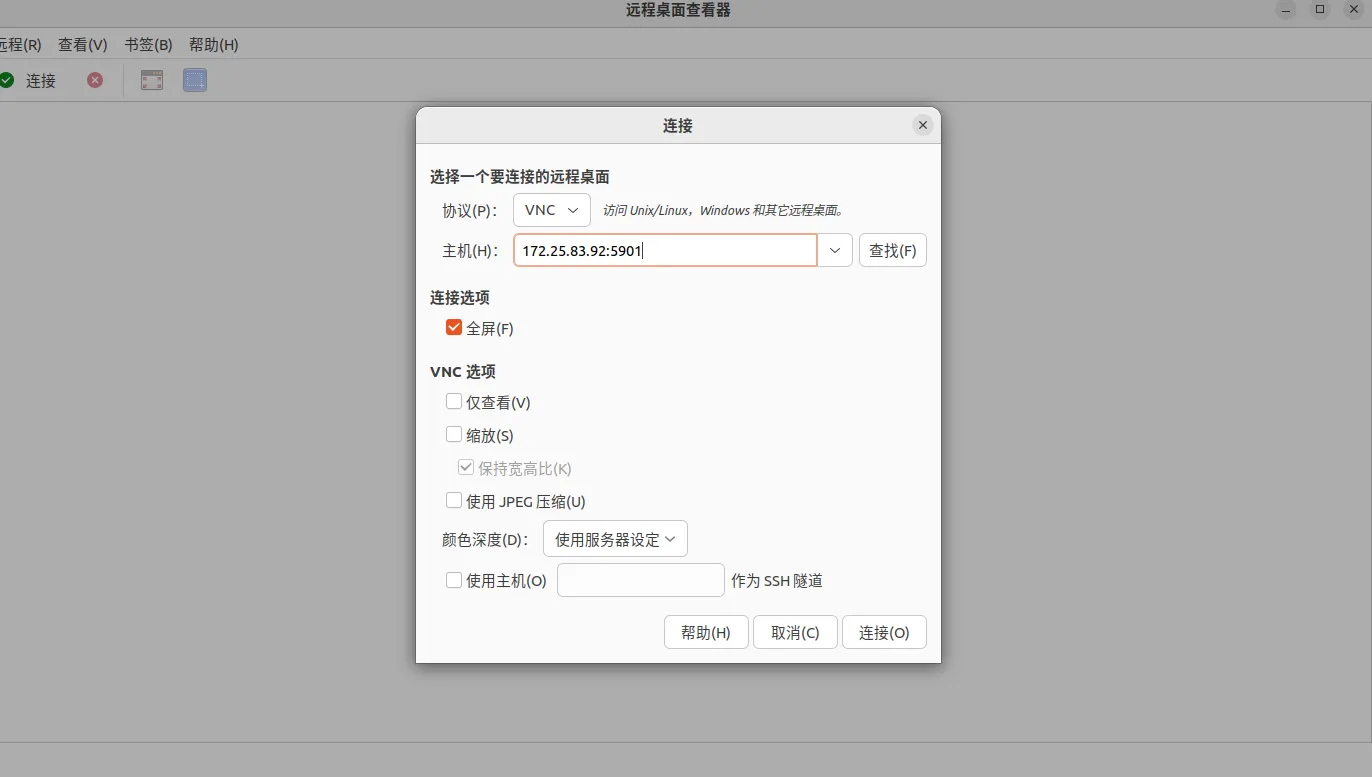
连接成功之后,如下
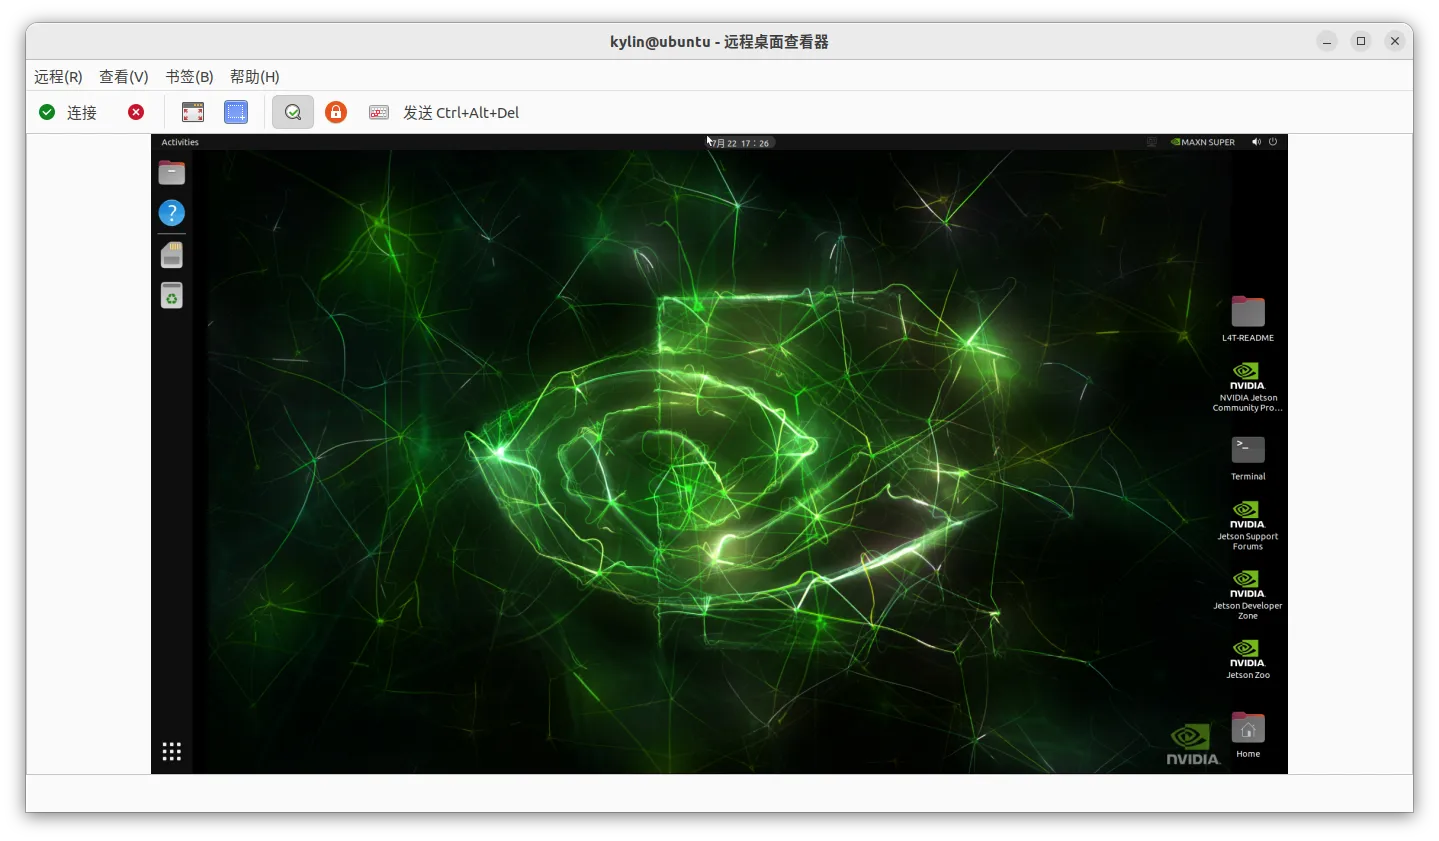
至此,nano 的vnc配置已经成功了,接下来配置novnc,vnovnc是web上的vnc,这样对我们调试来说更方便一点
配置novnc
第三种调试方式的变体,novnc。
novnc上面已经安装过了,这里我们只需要获取一下密码,然后登录即可。
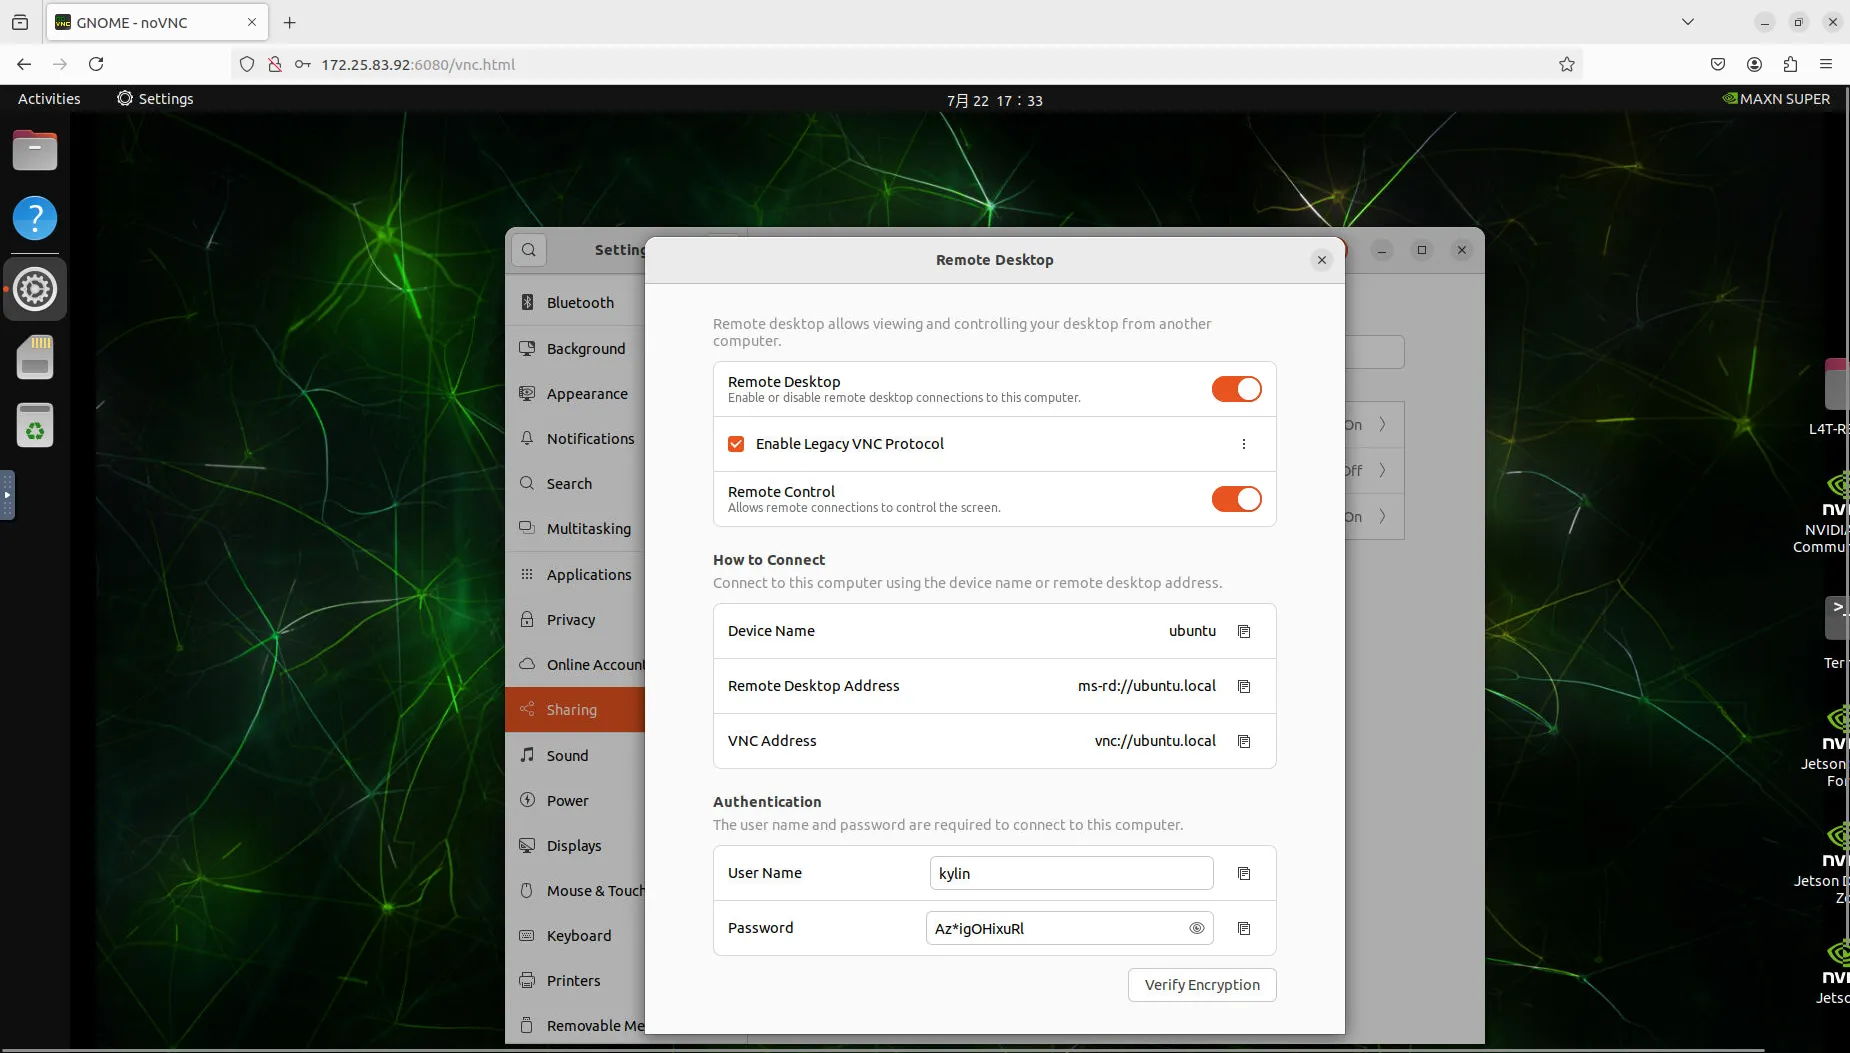
密码在设置--->共享--->登录中,如下
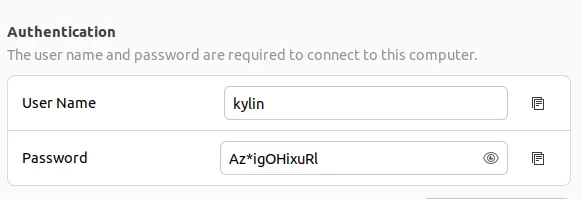
我这里获得密码是Az*igOHixuRl
此时运行novnc,如下
/usr/share/novnc/utils/launch.sh

Warning: could not find self.pem
Using installed websockify at /usr/bin/websockify
Starting webserver and WebSockets proxy on port 6080
WebSocket server settings:
  - Listen on :6080
  - Web server. Web root: /usr/share/novnc
  - No SSL/TLS support (no cert file)
  - proxying from :6080 to localhost:5900


Navigate to this URL:

    http://ubuntu:6080/vnc.html?host=ubuntu&port=6080

Press Ctrl-C to exit
然后我们通过浏览器,使用ip+6080端口登录,以防万一,我们可以确认一下配置如下,
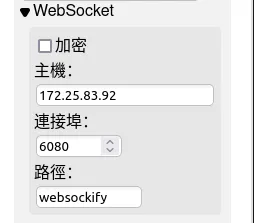
这里主机可能是主机名而不是主机IP,如ubuntu,这样如果我们没设置host,那么x86上不会识别,建议直接写ip即可。
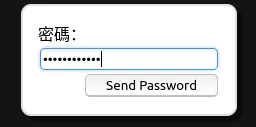
如果上述没有任何问题,那么直接点击登录,然后输入的密码是上述查到的密码Az*igOHixuRl
此时正常登录进入效果如下,可以看到是通过浏览器登录的设备,而不是通过vinagre程序
串口登录
为了调试设备,还要第四种方式,串口。
设备支持串口登录,所以我们首先要连接串口,默认情况下需要3.3V的串口如下接入。如下图所示
此时我们需要确认一下nano设置的串口信息,如下
$ cat /proc/cmdline
root=PARTUUID=d9006785-54de-4b47-b9c7-256d03cf1c58 rw rootwait rootfstype=ext4 mminit_loglevel=4 console=ttyTCU0,115200 firmware_class.path=/etc/firmware fbcon=map:0 video=efifb:off console=tty0 nv-auto-config bl_prof_dataptr=2031616@0x271E10000 bl_prof_ro_ptr=65536@0x271E00000
可以看到,信息会从ttyTCU0上吐出来,这个TCU0就是我们刚刚连接的串口。
putty的配置如下
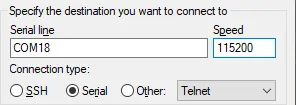
可以看到串口信息如下
Jetson System firmware version 36.4.4-gcid-41062509 date 2025-06-16T15:25:51+00:
00
ESC   to enter Setup.
F11   to enter Boot Manager Menu.
Enter to continue boot.

.......
nvcc 测试
这里装一下jetpack如下
apt install nvidia-jetpack
运行
cd /usr/local/cuda-12.6/bin
# ./nvcc -V
nvcc: NVIDIA (R) Cuda compiler driver
Copyright (c) 2005-2024 NVIDIA Corporation
Built on Wed_Aug_14_10:14:07_PDT_2024
Cuda compilation tools, release 12.6, V12.6.68
Build cuda_12.6.r12.6/compiler.34714021_0
jtop 测试

相关资料
https://developer.nvidia.com/embedded/jetson-linux-r3643
https://developer.nvidia.com/embedded/downloads
新增
值得注意的是,xorg的99-dummy.conf配置会导致默认x的渲染没有走nvidia的gpu,从而导致nvidia的一些测试用例运行失败。
如果实在要使用gpu渲染,同时不想接上显示器,鼠标键盘,希望使用vnc来调试,那么有两种办法
- 购买dp采集卡,通过usb插入电脑
- 购买dp虚拟显卡,虚拟显示器,通过novnc网页登录
我自己原来调试显示的时候买过采集卡,这就用上了。但是我还是喜欢vnc调试,所以我的方法是,通过采集卡连接,既可以像摄像头一样打开,又可以使用vnc连接,因为vnc连接很方便,我更倾向vnc连接。
LRU算法全称是Least recently used,最近最少使用算法,他作为Linux内核页面置换算法的默认选择。原理是通过设置一个容量,LRU会选择最近最少使用的数据,并将其删除,这样能够保证了一定的容量的角度上提高系统的最大性能。
最近突然产生了一个思考,LRU算法作为缓存系统常用算法,在用户空间是否有人实现过了呢。结果发现,LRU算法可以看到在python,go,java等高级语言上实现,而在C上的单独实现全网几乎没有。
鉴于此,本文从介绍LRU算法开始,然后自己通过C语言实现了LRU算法,并进行了详细的测试,并整理文档,如有需要设计缓存系统,此代码开箱即用。
常见页面替换算法
在Linux中,所有的页面申请通过缺页异常产生,当系统没有足够空闲的页帧提供时,就需要腾挪一下页出来。那么腾挪的办法有如下几种
- OPT
- FIFO
- LRU
接下来简单介绍这些常见的替换算法
OPT
OPT也就是Optimal Page Replacement,最佳页面替换算法,其思路是永远先替换内存中最不经常使用的页面,但是如何从代码角度获得内存中最不经常使用的页面呢?
实际上,这是不现实的,因为代码层面无法准确的预计到以后哪些页面会被访问,所以无法知道哪些页面是最不经常使用的。 但是在非代码层面,例如我们在做理论分析的时候,此算法可以用于分析和衡量其他算法的实际效率。
FIFO
FIFO也就是First In First Out ,先入线程页面替换算法,其思路很简单,就是利用FIFO的特性,让所有先进入队列的页面先删除,其优点是代码设计非常简单,例如使用循环链表就能轻松实现,但是缺点是其实际应用效率并不高。
因为在实际场景中,先加入的页面,可能会被多次访问,如果使用FIFO置换页面,那么如果访问先加入的页面,那么就会频繁的换入换成,很容易造成系统颠簸。
所以在讨论页面置换的场景下,不能单纯的忽略历史数据的再次访问的情况。所以FIFO不是更好的置换算法
LRU
LRU也就是Least Recently Used,最近最少使用页面替换算法,根据刚刚讨论FIFO的缺陷,我们不能单纯的忽略历史数据,所以LRU算法应运而生
如果我们将最近访问的历史数据的优先级进行排序,那么我们就从FIFO算法转变成LRU算法,那样,每次页面替换时,默认将未被访问的先进入缓存队列的页面换出,任何被重复访问的数据都保存到优先级最高的队列头。
LRU的实现
根据上面几种算法的讨论,我们清晰的了解了LRU算法的基本原理,现在可以思考其实现思路。
- 首先,我们肯定需要通过一个循环单链表来实现FIFO的策略
- 其次,我们需要将链表尾数据挪动到链表头,所以基于循环单链表的FIFO需要修改成循环双链表,其时间复杂度是O(1)
- 再者,每次访问缓存中的页面元素时,如果从双链表中寻找,那么遍历链表复杂度是O(n),为了提高性能,可以使用hash,使其变成O(1)
- 最后,因为hash的碰撞问题,我们可以选择开发寻址法或链表法,鉴于链表法更简单,所以我使用链表法
这样基于 hash 和 doubly link list 的实现能够以最高的效率实现LRU算法,其理论是O(1),但实际是O(1)-O(n)中间,为什么呢?
因为hash存在碰撞,其碰撞情况取决于负载因子(load facotr),其计算如下load factor = capacity / slots,如果slots越大,那么hash碰撞更低,则寻找缓存页面元素的时间复杂度是O(1),如果slots为1,那么hash碰撞情况为100%,每次寻找缓存页面元素都需要遍历链表,则其时间复杂度是O(n),那么合适的设计load factor就是LRU算法的性能关键。
最终实现的LRU算法应该提供如下两个函数
- lru_get(key)
- lru_put(key,value)
get的实现
因为hash的特性,我们需要设计键值对,我们不需要完全实现一个完整意义上的hash去实现LRU,我们只需要保证key相同时,hash找到缓存value的效率是O(1)即可。 举个例子:
如果slots=10,此时key是22,那么lru_get将获取 22 % 10 ,也就是 slot=2 中的元素。又因为slot = 2 中存放的是链表,那么遍历此链表中的元素,找到key == 22 的value即可返回。
可以发现,如果slot=2 的链表有多个元素,那么证明hash还是存在碰撞,此时不是完全的O(1),但是如果slot=2只有key == 22 一个元素,那么遍历链表就是寻找其下一个节点而已,那么就是完全意义上的O(1)
如果lru_get时,key 不再任何一个槽中,则返回-1,代表lru中没有此缓存值
put的实现
关于put的实现,我们需要留意如下几个步骤
- 如果通过hash寻找到缓存,则更新value,其方法与get一致,但多了一步,就是将匹配到的节点移动到双链表头部
- 如果找不到缓存,则新建一个节点
- 因为新建了一个节点,所以需要判断链表的大小是否大于缓存的容量,如果大于,则从双链表尾部踢出一个节点
这样也就实现了LRU算法的本意,最近最少使用,最近的意思是在容量中的缓存,最少的意思是在容量中最后一个节点。组合起来就是:当新增节点时,将容量中最不经常使用的,也就是最后一个节点踢出
值得注意的是,这里虽然提到了最后一个节点是最不经常使用的,但实际上是无需使用任何排序算法的,其原因是链表的隐藏特性,对于链表的添加,都是从链表的头/尾添加,这样就已经隐式的在链表中排序了,链表最后一个节点就是最早进入链表的节点。
总结
上文比较详细的介绍了LRU算法的理论知识,可以让未对LRU算法了解的人有一个清晰的认知,本人的本意是发现Linux发行平台上,使用LRU算法的C实现例子偏少(内核外),所以抽空周末实现了C语言的LRU版本,为了介绍此版本LRU算法的目的而产生。
在实现过程中也踩了一点坑,那就是按照自己的想法,没有实现hash去解决查询的效率问题,而是通过遍历的方式寻找的key,但是后面通过网页检索回顾才发现,可以实现一个hash,将O(n)降低为0(1)。后面我又翻阅了不同开源仓库的LRU实现方法,基于开放寻找法和链表法都做了实现,但发现链表法更直接有效,所以又根据自己理解进行了完善LRU的实现。
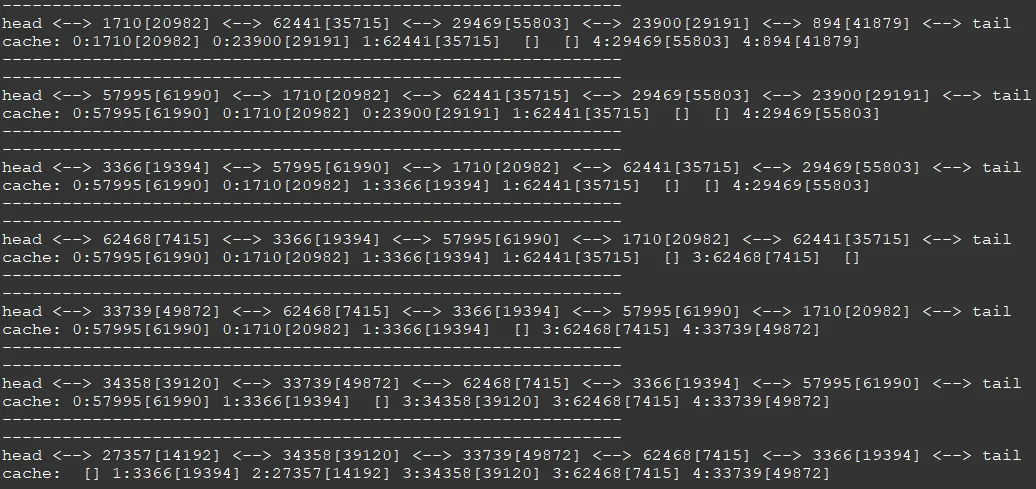
下面是一个测试的例子
操作系统有很多问题出现在触摸事件上,而平时自己手上只有鼠标控制,突发奇想,如果我将鼠标事件虚拟成触摸,那么我复现问题,调试代码不是很方便么。
uinput
uinput是用户空间的输入设备驱动,它提供了一种功能将内核的输入设备搬到应用层来模拟。内核通过如下配置打开
CONFIG_INPUT_UINPUT=y
xlib
鉴于我们的系统目前默认是x11环境,所以我们需要使用xlib的XQueryPointer函数,此函数可以获取X下的鼠标指针位置,XQueryPointer的原型如下
Bool XQueryPointer(Display *display, Window w, Window *root_return, Window *child_return, int *root_x_return, int *root_y_return, int *win_x_return, int *win_y_return, unsigned int *mask_return);
实现
根据上面的信息,如果我们声明uinput是一个输入设备,然后通过XQueryPointer拿到鼠标在X的位置后,将其传给uinput,那么我们在系统中就白白获得了一个虚假的触摸设备。代码如下
#include <stdio.h>
#include <pthread.h>
#include <stdlib.h>
#include <string.h>
#include <time.h>
#include <fcntl.h>
#include <unistd.h>
#include <linux/uinput.h>
#include <X11/Xlib.h>

void emit(int fd, int type, int code, int val)
{
   struct input_event ie;

   ie.type = type;
   ie.code = code;
   ie.value = val;
   ie.time.tv_sec = 0;
   ie.time.tv_usec = 0;

   write(fd, &ie, sizeof(ie));
}

int main(void)
{
   struct uinput_setup usetup;
   struct uinput_abs_setup uabs;

   int fd = open("/dev/uinput", O_WRONLY | O_NONBLOCK);

   ioctl(fd, UI_SET_EVBIT, EV_KEY);
   ioctl(fd, UI_SET_KEYBIT, BTN_TOUCH);

   ioctl(fd, UI_SET_EVBIT, EV_REL);
   ioctl(fd, UI_SET_RELBIT, REL_X);
   ioctl(fd, UI_SET_RELBIT, REL_Y);

   ioctl(fd, UI_SET_EVBIT, EV_ABS);
   ioctl(fd, UI_SET_ABSBIT, ABS_MT_POSITION_X);
   ioctl(fd, UI_SET_ABSBIT, ABS_MT_POSITION_Y);
   ioctl(fd, UI_SET_ABSBIT, ABS_MT_SLOT);
   ioctl(fd, UI_SET_ABSBIT, ABS_MT_TRACKING_ID);

   memset(&usetup, 0, sizeof(usetup));
   usetup.id.bustype = BUS_USB;
   usetup.id.vendor = 0x1234;
   usetup.id.product = 0x5678;
   strcpy(usetup.name, "kylin virtual touch device");

   ioctl (fd, UI_SET_PROPBIT, INPUT_PROP_DIRECT);

   memset(&uabs, 0, sizeof(uabs));
   uabs.code = ABS_MT_SLOT;
   uabs.absinfo.minimum = 0;
   uabs.absinfo.maximum = 9;
   ioctl(fd, UI_ABS_SETUP, &uabs);

   memset(&uabs, 0, sizeof(uabs));
   uabs.code = ABS_MT_POSITION_X;
   uabs.absinfo.minimum = 0;
   uabs.absinfo.maximum = 1920;
   uabs.absinfo.resolution= 76;
   ioctl(fd, UI_ABS_SETUP, &uabs);

   memset(&uabs, 0, sizeof(uabs));
   uabs.code = ABS_MT_POSITION_Y;
   uabs.absinfo.minimum = 0;
   uabs.absinfo.maximum = 1200;
   uabs.absinfo.resolution= 106;
   ioctl(fd, UI_ABS_SETUP, &uabs);

   ioctl(fd, UI_DEV_SETUP, &usetup);
   ioctl(fd, UI_DEV_CREATE);

   Display *display;
   Window root;
   Window child;
   int root_x, root_y, win_x, win_y;
   unsigned int mask;

   display = XOpenDisplay(NULL);
   if (display == NULL) {
       return 1;
   }

    root = DefaultRootWindow(display);

   /*
    * On UI_DEV_CREATE the kernel will create the device node for this
    * device. We are inserting a pause here so that userspace has time
    * to detect, initialize the new device, and can start listening to
    * the event, otherwise it will not notice the event we are about
    * to send. This pause is only needed in our example code!
    */
   sleep(1);

   int mouse_fd = open("/dev/input/event4", O_RDONLY);
   if (mouse_fd < 0) {
       ioctl(fd, UI_DEV_DESTROY);
       close(fd);
       return EXIT_FAILURE;
   }

   while (1) {
       struct input_event ie;
       read(mouse_fd, &ie, sizeof(ie));

       if (ie.type == EV_REL && (ie.code == REL_X || ie.code == REL_Y)) {
	       continue;
       }

       switch (ie.code){
	      	case BTN_LEFT:
			if(ie.value==1){
				XQueryPointer(display, root, &root, &child, &root_x, &root_y, &win_x, &win_y, &mask);
			      	emit(fd, EV_ABS, ABS_MT_TRACKING_ID, 1);
			      	emit(fd, EV_ABS, ABS_MT_POSITION_X, root_x);
			      	emit(fd, EV_ABS, ABS_MT_POSITION_Y, root_y);
			      	emit(fd, EV_KEY, BTN_TOUCH, 1);
			      	emit(fd, EV_SYN, SYN_REPORT, 0);
			}else{
			      	emit(fd, EV_ABS, ABS_MT_TRACKING_ID, -1);
				emit(fd, EV_KEY, BTN_TOUCH, 0);
				emit(fd, EV_SYN, SYN_REPORT, 0);
			}
		default:
                        break;
       }
   }

   /*
    * Give userspace some time to read the events before we destroy the
    * device with UI_DEV_DESTOY.
    */
   sleep(1);

   XCloseDisplay(display);
   ioctl(fd, UI_DEV_DESTROY);
   close(fd);

   return 0;
}
值得注意的是,因为我们插入的鼠标的事件是不太确定的,所以需要提前手动查询一下,如下
先通过lsusb查看鼠标设备
# lsusb
......
Bus 001 Device 003: ID 25a7:fa61 Compx 2.4G Receiver
然后通过proc下的信息找到对应的事件
# cat /proc/bus/input/devices
......
I: Bus=0003 Vendor=25a7 Product=fa61 Version=0110
N: Name="Compx 2.4G Receiver Mouse"
P: Phys=usb-fc800000.usb-1.2/input1
S: Sysfs=/devices/platform/fc800000.usb/usb1/1-1/1-1.2/1-1.2:1.1/0003:25A7:FA61.0002/input/input4
U: Uniq=
H: Handlers=event4
B: PROP=0
B: EV=17
B: KEY=1f0000 0 0 0 0
B: REL=1943
B: MSC=10
此时我们知道事件是event4,那么代码填入的就是event4如下
int mouse_fd = open("/dev/input/event4", O_RDONLY);
此时编译上述代码如下
gcc mouse2touch.c -lX11 -pthread -o mouse2touch
如果我们在机器内运行,因为会XOpenDisplay,所以需要DISPLAY的环境变量设置正确,默认可以设置如下
export DISPLAY=:0
此时直接运行即可
root@kylin:~# ./mouse2touch
注意此程序是daemon进程,会while 1监听事件,如果突然退出需要检查是否有其他异常
当程序运行后,我们看到内核会有如下日志
input: kylin virtual touch device as /devices/virtual/input/input28
然后我们查看事件也能在/proc/bus/input/devices存在如下
I: Bus=0003 Vendor=1234 Product=5678 Version=0000
N: Name="kylin virtual touch device"
P: Phys=
S: Sysfs=/devices/virtual/input/input28
U: Uniq=
H: Handlers=event18
B: PROP=2
B: EV=f
B: KEY=400 0 0 0 0 0
B: REL=3
B: ABS=260800000000000
同样的Xorg也能正常识别,所以Xorg也有如下日志
tail -f /var/log/Xorg.0.log
(II) event18 - kylin virtual touch device: is tagged by udev as: Touchscreen
(II) event18 - kylin virtual touch device: device is a touch device
正好对应上了。此时我们点击鼠标,可以看到有触摸的特效出现
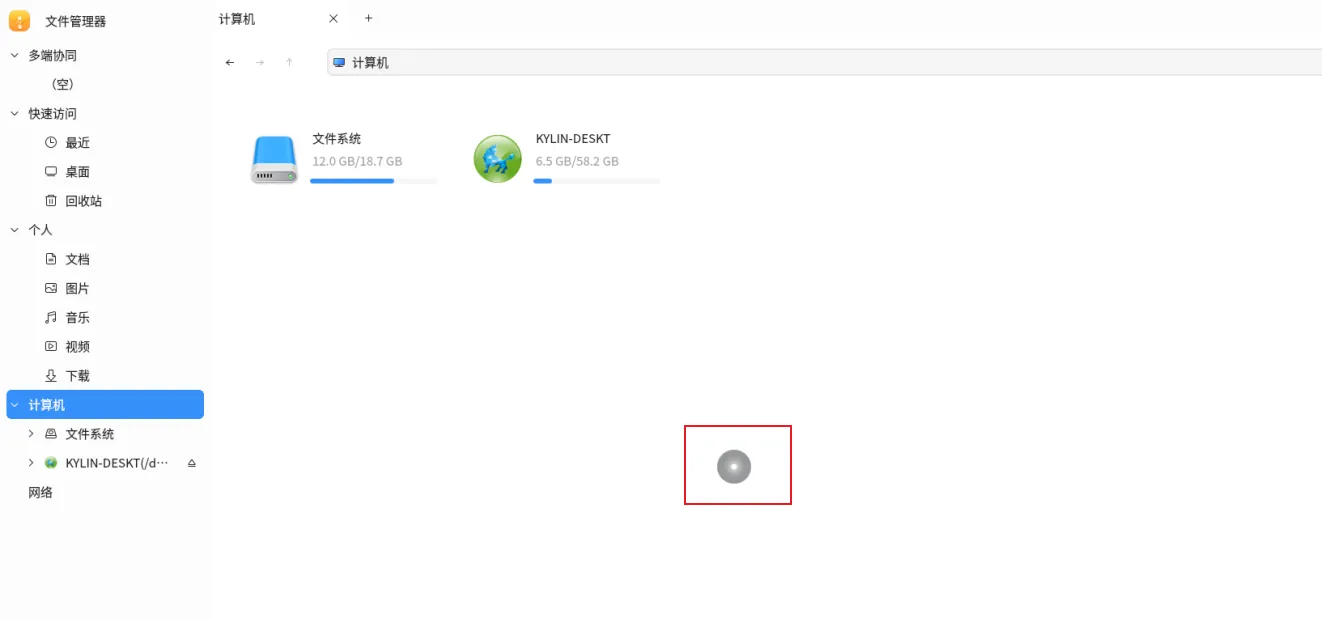
可以发现功能得到实现了,至此已经完全满足我在不需要触摸屏的前提下调试触摸的操作系统BUG了。
缺陷
上面通过编写了一个小程序,实现了鼠标模拟触摸的情况,但是还是有一些小缺点的,主要如下
- 鼠标和触摸两个事件都会触发,所以单击对系统而言是双击
- uinput的触摸事件没有TOUCH_UPDATE,所以没办法实现拖拽
- 我的代码没有去打开多个设备实现模拟多指,所以没办法调试手势问题
总结
根据上面的信息,我简单的利用了uinput来辅助调试操作系统触摸问题,稍微扩展一下,我留个疑问,有兴趣可以思考一下。
- 互联互通的鼠标流转功能,是不是uinput实现更底层,直接,和高性能呢?
