rtems不仅支持malloc,还支持region分配,这两个都是基于heap来分配的,而partition的内存分配是直接通过链表管理的内存池,他不会记录block信息,本文介绍partition分配内存
一、测试代码
复用测试region的代码,稍作修改可以直接测试partition,如下
#define CONFIGURE_MAXIMUM_PARTITIONS 1
static void test_partition_create(void)
{
    rtems_status_code sc;
    rtems_id id;
    void *partition_buf1;
    void *partition_buf2;

    sc = rtems_partition_create(
     name,
     (void* )0x4000000,
     128,
     32,
     RTEMS_DEFAULT_ATTRIBUTES,
     &id
   );

    printf( "sc=%d \n", sc);

    sc = rtems_partition_get_buffer( id, &partition_buf1);
    printf( "sc=%d buf1=%p\n", sc, partition_buf1);
    sc = rtems_partition_get_buffer( id, &partition_buf2);
    printf( "sc=%d buf2=%p\n", sc, partition_buf2);

    sc = rtems_partition_return_buffer(id, partition_buf1);
    printf( "sc=%d \n", sc);
    sc = rtems_partition_return_buffer(id, partition_buf2);
    printf( "sc=%d \n", sc);
    return ;
}
二、测试运行
直接测试效果如下:
(gdb) x/14xg 0x4000000

0x4000000:        0x0000000004000020      0x00000000001056d0
0x4000010:        0x0000000000000000      0x0000000000000000
0x4000020:        0x0000000004000040      0x00000000001056d0
0x4000030:        0x0000000000000000      0x0000000000000000
0x4000040:        0x0000000004000060      0x00000000001056d0
0x4000050:        0x0000000000000000      0x0000000000000000
0x4000060:        0x00000000001056d8      0x0000000004000040
可以发现,我申请了128内存,按照32字节划分,那么每块都是0x20大小,如果起始地址是0x4000000,则划分为如下
0x4000000/0x4000020/0x4000040/0x4000060
值得注意的是partition分配的内存,不会带block结构体,也就少了16字节的冗余,这种情况下,也不会参与内存的回收,规整,相当于蛋糕自己随便分,整体效率是最高的。
如果留意这些分区的内存的话,可以发现管理这些内存使用的是16字节的链表。接下来分析代码
三、代码解析
3.1 create
创建分区代码如下
rtems_status_code rtems_partition_create(
  rtems_name       name,
  void            *starting_address,
  uintptr_t        length,
  size_t           buffer_size,
  rtems_attribute  attribute_set,
  rtems_id        *id
)
{
  Partition_Control *the_partition;

  if ( !rtems_is_name_valid( name ) ) {
    return RTEMS_INVALID_NAME;
  }

  if ( id == NULL ) {
    return RTEMS_INVALID_ADDRESS;
  }

  if ( starting_address == NULL ) {
    return RTEMS_INVALID_ADDRESS;
  }

  if ( length == 0 ) {
    return RTEMS_INVALID_SIZE;
  }

  if ( buffer_size == 0 ) {
    return RTEMS_INVALID_SIZE;
  }

  if ( length < buffer_size ) {
    return RTEMS_INVALID_SIZE;
  }

  /*
   * Ensure that the buffer size is an integral multiple of the pointer size so
   * that each buffer begin meets the chain node alignment.
   */
  if ( buffer_size % CPU_SIZEOF_POINTER != 0 ) {
    return RTEMS_INVALID_SIZE;
  }

  if ( buffer_size < sizeof( Chain_Node ) )
    return RTEMS_INVALID_SIZE;

  /*
   * Ensure that the buffer area starting address is aligned on a pointer
   * boundary so that each buffer begin meets the chain node alignment.
   */
  if ( (uintptr_t) starting_address % CPU_SIZEOF_POINTER != 0 ) {
    return RTEMS_INVALID_ADDRESS;
  }

#if defined(RTEMS_MULTIPROCESSING)
  if ( !_System_state_Is_multiprocessing ) {
    attribute_set = _Attributes_Clear( attribute_set, RTEMS_GLOBAL );
  }
#endif

  the_partition = _Partition_Allocate();

  if ( !the_partition ) {
    _Objects_Allocator_unlock();
    return RTEMS_TOO_MANY;
  }

#if defined(RTEMS_MULTIPROCESSING)
  if ( _Attributes_Is_global( attribute_set ) &&
       !( _Objects_MP_Allocate_and_open( &_Partition_Information, name,
                            the_partition->Object.id, false ) ) ) {
    _Objects_Free( &_Partition_Information, &the_partition->Object );
    _Objects_Allocator_unlock();
    return RTEMS_TOO_MANY;
  }
#endif

  _Partition_Initialize(
    the_partition,
    starting_address,
    length,
    buffer_size,
    attribute_set
  );

  *id = _Objects_Open_u32(
    &_Partition_Information,
    &the_partition->Object,
    name
  );

#if defined(RTEMS_MULTIPROCESSING)
  if ( _Attributes_Is_global( attribute_set ) )
    _Partition_MP_Send_process_packet(
      PARTITION_MP_ANNOUNCE_CREATE,
      the_partition->Object.id,
      name,
      0                  /* Not used */
    );
#endif

  _Objects_Allocator_unlock();
  return RTEMS_SUCCESSFUL;
}
这里的重点是
_Partition_Initialize(
  the_partition,
  starting_address,
  length,
  buffer_size,
  attribute_set
);
可以查到_Partition_Initialize调用的_Chain_Initialize,我们查看_Chain_Initialize的实现如下
void _Chain_Initialize(
  Chain_Control *the_chain,
  void           *starting_address,
  size_t         number_nodes,
  size_t         node_size
)
{
  size_t count = number_nodes;
  Chain_Node *head = _Chain_Head( the_chain );
  Chain_Node *tail = _Chain_Tail( the_chain );
  Chain_Node *current = head;
  Chain_Node *next = starting_address;

  _Assert( node_size >= sizeof( *next ) );

  head->previous = NULL;

  while ( count-- ) {
    current->next  = next;
    next->previous = current;
    current        = next;
    next           = (Chain_Node *)
                        _Addresses_Add_offset( (void *) next, node_size );
  }

  current->next = tail;
  tail->previous = current;
}
可以发现, 这里定义了一个双链表,其中count就是分区的数量,根据分区的数量直接填充链表的成员,链表非常简单,如下:
typedef struct Chain_Node {
  /** This points to the node after this one on this chain. */
  struct Chain_Node *next;
  /** This points to the node immediate prior to this one on this chain. */
  struct Chain_Node *previous;
} Chain_Node;
可以发现,和测试运行中的内存布局完全一致。
3.2 get buffer
rtems_partition_get_buffer函数的实现如下:
rtems_status_code rtems_partition_get_buffer(
  rtems_id   id,
  void     **buffer
)
{
  Partition_Control *the_partition;
  ISR_lock_Context   lock_context;
  void              *the_buffer;

  if ( buffer == NULL ) {
    return RTEMS_INVALID_ADDRESS;
  }

  the_partition = _Partition_Get( id, &lock_context );

  if ( the_partition == NULL ) {
#if defined(RTEMS_MULTIPROCESSING)
    return _Partition_MP_Get_buffer( id, buffer );
#else
    return RTEMS_INVALID_ID;
#endif
  }

  _Partition_Acquire_critical( the_partition, &lock_context );
  the_buffer = _Partition_Allocate_buffer( the_partition );

  if ( the_buffer == NULL ) {
    _Partition_Release( the_partition, &lock_context );
    return RTEMS_UNSATISFIED;
  }

  the_partition->number_of_used_blocks += 1;
  _Partition_Release( the_partition, &lock_context );
  *buffer = the_buffer;
  return RTEMS_SUCCESSFUL;
}
代码熟悉了就发现非常简单,我们关注_Partition_Allocate_buffer,它调用_Chain_Get_unprotected,然后调用_Chain_Get_first_unprotected
_Chain_Get_first_unprotected的实现如下
static inline Chain_Node *_Chain_Get_first_unprotected(
  Chain_Control *the_chain
)
{
  Chain_Node *head;
  Chain_Node *old_first;
  Chain_Node *new_first;

  _Assert( !_Chain_Is_empty( the_chain ) );

  head = _Chain_Head( the_chain );
  old_first = head->next;
  new_first = old_first->next;

  head->next = new_first;
  new_first->previous = head;

#if defined(RTEMS_DEBUG)
  _Chain_Set_off_chain( old_first );
#endif

  return old_first;
}
可以发现,这里get buffer的操作就是取出head,然后通过head拿到next返回,并且将head->next->next返回给head→next,相当于list的del head操作
3.3 return buffer
rtems_partition_return_buffer的实现如下:
rtems_status_code rtems_partition_return_buffer(
  rtems_id  id,
  void     *buffer
)
{
  Partition_Control *the_partition;
  ISR_lock_Context   lock_context;

  the_partition = _Partition_Get( id, &lock_context );

  if ( the_partition == NULL ) {
#if defined(RTEMS_MULTIPROCESSING)
    return _Partition_MP_Return_buffer( id, buffer );
#else
    return RTEMS_INVALID_ID;
#endif
  }

  _Partition_Acquire_critical( the_partition, &lock_context );

  if ( !_Partition_Is_address_a_buffer_begin( the_partition, buffer ) ) {
    _Partition_Release( the_partition, &lock_context );
    return RTEMS_INVALID_ADDRESS;
  }

  _Partition_Free_buffer( the_partition, buffer );
  the_partition->number_of_used_blocks -= 1;
  _Partition_Release( the_partition, &lock_context );
  return RTEMS_SUCCESSFUL;
}
同样的,我们关注_Partition_Free_buffer,从而关注_Chain_Append_unprotected,其实现如下
static inline void _Chain_Append_unprotected(
  Chain_Control *the_chain,
  Chain_Node    *the_node
)
{
  Chain_Node *tail;
  Chain_Node *old_last;

  _Assert( _Chain_Is_node_off_chain( the_node ) );

  tail = _Chain_Tail( the_chain );
  old_last = tail->previous;

  the_node->next = tail;
  tail->previous = the_node;
  old_last->next = the_node;
  the_node->previous = old_last;
}
这里就是对双链表做了尾插,list add tail。
四、总结
至此,关于rtems partition 内存的操作介绍完毕了。可以发现,如果不需要碎片管理,则partition的内存分配相当于内存池,简单高效。
在bootcard中有流程是heap的初始化,为了更详细的了解内存初始化,这里以_Heap_Initialize为入口,详细了解具体做了什么
一、RTEMS默认初始化哪些堆
我们之前分析流程的时候,可以知道RTEMS初始化了多个堆,主要如下
_Workspace_Handler_initialization 会初始化_Heap_Initialize
_Malloc_Initialize   会初始化 _Heap_Initialize
add_area的cache_coherent_heap会初始化_Heap_Initialize
总共三个heap区,本文以malloc为例关注_Heap_Initialize 的初始化
二、代码解析
uintptr_t _Heap_Initialize(
  Heap_Control *heap,
  void *heap_area_begin_ptr, // 起始地址
  uintptr_t heap_area_size, // 大小
  uintptr_t page_size
)
{
  Heap_Statistics *const stats = &heap->stats;
  uintptr_t const heap_area_begin = (uintptr_t) heap_area_begin_ptr;
  uintptr_t const heap_area_end = heap_area_begin + heap_area_size;
  uintptr_t first_block_begin = 0;
  uintptr_t first_block_size = 0;
  uintptr_t last_block_begin = 0;
  uintptr_t min_block_size = 0;
  bool area_ok = false;
  Heap_Block *first_block = NULL;
  Heap_Block *last_block = NULL;

    // 如果page_size 没有设置,则设置为cpu对齐大小,否则按照设置大小向cpu对齐
  if ( page_size == 0 ) {
    page_size = CPU_ALIGNMENT;
  } else {
    page_size = _Heap_Align_up( page_size, CPU_ALIGNMENT );

    if ( page_size < CPU_ALIGNMENT ) {
      /* Integer overflow */
      return 0;
    }
  }

    // 计算最小的块大小
  min_block_size = _Heap_Min_block_size( page_size );

    // 获取第一个块和最后一个块的地址
  area_ok = _Heap_Get_first_and_last_block(
    heap_area_begin,
    heap_area_size,
    page_size,
    min_block_size,
    &first_block,
    &last_block
  );
  if ( !area_ok ) {
    return 0;
  }

  memset(heap, 0, sizeof(*heap));

  #ifdef HEAP_PROTECTION
    heap->Protection.block_initialize = _Heap_Protection_block_initialize_default;
    heap->Protection.block_check = _Heap_Protection_block_check_default;
    heap->Protection.block_error = _Heap_Protection_block_error_default;
  #endif

    // 计算第一个块的大小,拿最后一个块的开始减去第一个块的开始
  first_block_begin = (uintptr_t) first_block;
  last_block_begin = (uintptr_t) last_block;
  first_block_size = last_block_begin - first_block_begin;

    // 设置第一个块,结合block的结构体,将prev_size设置为堆的末尾
    // 将第一个块的next设置为空闲链表的尾,prev设置为空闲链表的头,这里相当于初始化空闲链表
  /* First block */
  first_block->prev_size = heap_area_end;
  first_block->size_and_flag = first_block_size | HEAP_PREV_BLOCK_USED;
  first_block->next = _Heap_Free_list_tail( heap );
  first_block->prev = _Heap_Free_list_head( heap );
  _Heap_Protection_block_initialize( heap, first_block );

//  报错堆的信息,如页大小,最小块大小,堆范围,第一个块地址,最后一个块地址
// 设置空闲链表的第一个元素是first_block
  /* Heap control */
  heap->page_size = page_size;
  heap->min_block_size = min_block_size;
  heap->area_begin = heap_area_begin;
  heap->area_end = heap_area_end;
  heap->first_block = first_block;
  heap->last_block = last_block;
  _Heap_Free_list_head( heap )->next = first_block;
  _Heap_Free_list_tail( heap )->prev = first_block;

//  将最后一个blokc的prev_size设置为第一个block的size
  /* Last block */
  last_block->prev_size = first_block_size;
  last_block->size_and_flag = 0;
  _Heap_Set_last_block_size( heap );
  _Heap_Protection_block_initialize( heap, last_block );

// 统计信息 总大小,空闲大小,块数
  /* Statistics */
  stats->size = first_block_size;
  stats->free_size = first_block_size;
  stats->min_free_size = first_block_size;
  stats->free_blocks = 1;
  stats->max_free_blocks = 1;

  _Heap_Protection_set_delayed_free_fraction( heap, 2 );

  _HAssert( _Heap_Is_aligned( heap->page_size, CPU_ALIGNMENT ) );
  _HAssert( _Heap_Is_aligned( heap->min_block_size, page_size ) );
  _HAssert(
    _Heap_Is_aligned( _Heap_Alloc_area_of_block( first_block ), page_size )
  );
  _HAssert(
    _Heap_Is_aligned( _Heap_Alloc_area_of_block( last_block ), page_size )
  );

//  返回第一个块的大小
  return first_block_size;
}
代码中有注释,我们可以知道,对于heap初始化来说,其主要是构造了Heap_Control *heap结构体,然后计算Heap_Block的大小来分配每个block,并为每个block来构造block信息,最后设置heap的统计信息。
三、确认构造信息
根据gdb我们可以观察heap构造情况,首先查看heap control结构体,结构体定义如下:
struct Heap_Control {
  Heap_Block free_list;
  uintptr_t page_size;
  uintptr_t min_block_size;
  uintptr_t area_begin;
  uintptr_t area_end;
  Heap_Block *first_block;
  Heap_Block *last_block;
  Heap_Statistics stats;
  #ifdef HEAP_PROTECTION
    Heap_Protection Protection;
  #endif
};
实际信息如下
(gdb) p _Malloc_Heap $1 = {free_list = {prev_size = 0, size_and_flag = 0, next = 0x0, prev = 0x0}, page_size = 0, min_block_size = 0, area_begin = 0, area_end = 0, first_block = 0x0, last_block = 0x0, stats = {lifetime_allocated = 0, lifetime_freed = 0, size = 0, free_size = 0, min_free_size = 0, free_blocks = 0, max_free_blocks = 0, used_blocks = 0, max_search = 0, searches = 0, allocs = 0, failed_allocs = 0, frees = 0, resizes = 0}}(gdb) p _Malloc_Heap $2 = {free_list = {prev_size = 0, size_and_flag = 0, next = 0x1342a0, prev = 0x1342a0}, page_size = 16, min_block_size = 32, area_begin = 1262239, area_end = 1072431104, first_block = 0x1342a0, last_block = 0x3febfff0, stats = { lifetime_allocated = 0, lifetime_freed = 0, size = 1071168848, free_size = 1071168848, min_free_size = 1071168848, free_blocks = 1, max_free_blocks = 1, used_blocks = 0, max_search = 0, searches = 0, allocs = 0, failed_allocs = 0, frees = 0, resizes = 0}}
heap block结构体如下
struct Heap_Block {
  uintptr_t prev_size;
  uintptr_t size_and_flag;
  Heap_Block *next;
  Heap_Block *prev;
};
实际信息如下
(gdb) p *(Heap_Block *)0x1342a0 $5 = {prev_size = 1072431104, size_and_flag = 1071168849, next = 0x102c90 <_Malloc_Heap>, prev = 0x102c90 <_Malloc_Heap>}(gdb) p *(Heap_Block *)0x3febfff0 $6 = {prev_size = 1071168848, size_and_flag = 18446744072638382768, next = 0x0, prev = 0x0}
heap statistics结构体如下
typedef struct {
  /**
   * @brief Lifetime number of bytes allocated from this heap.
   *
   * This value is an integral multiple of the page size.
   */
  uint64_t lifetime_allocated;

  /**
   * @brief Lifetime number of bytes freed to this heap.
   *
   * This value is an integral multiple of the page size.
   */
  uint64_t lifetime_freed;

  /**
   * @brief Size of the allocatable area in bytes.
   *
   * This value is an integral multiple of the page size.
   */
  uintptr_t size;

  /**
   * @brief Current free size in bytes.
   *
   * This value is an integral multiple of the page size.
   */
  uintptr_t free_size;

  /**
   * @brief Minimum free size ever in bytes.
   *
   * This value is an integral multiple of the page size.
   */
  uintptr_t min_free_size;

  /**
   * @brief Current number of free blocks.
   */
  uint32_t free_blocks;

  /**
   * @brief Maximum number of free blocks ever.
   */
  uint32_t max_free_blocks;

  /**
   * @brief Current number of used blocks.
   */
  uint32_t used_blocks;

  /**
   * @brief Maximum number of blocks searched ever.
   */
  uint32_t max_search;

  /**
   * @brief Total number of searches.
   */
  uint32_t searches;

  /**
   * @brief Total number of successful allocations.
   */
  uint32_t allocs;

  /**
   * @brief Total number of failed allocations.
   */
  uint32_t failed_allocs;

  /**
   * @brief Total number of successful frees.
   */
  uint32_t frees;

  /**
   * @brief Total number of successful resizes.
   */
  uint32_t resizes;
} Heap_Statistics;
实际信息在heap结构体已经打印,这里摘出来如下
(gdb) p _Malloc_Heap->stats $10 = {lifetime_allocated = 0, lifetime_freed = 0, size = 0, free_size = 0, min_free_size = 0, free_blocks = 0, max_free_blocks = 0, used_blocks = 0, max_search = 0, searches = 0, allocs = 0, failed_allocs = 0, frees = 0, resizes = 0}(gdb) p _Malloc_Heap->stats $11 = {lifetime_allocated = 0, lifetime_freed = 0, size = 1071168848, free_size = 1071168848, min_free_size = 1071168848, free_blocks = 1, max_free_blocks = 1, used_blocks = 0, max_search = 0, searches = 0, allocs = 0, failed_allocs = 0, frees = 0, resizes = 0}
四、总结
至此,我们清楚的知道了RTEMS系统的堆的初始化方式。后续调试堆的时候,这些结构体对我们非常有用
rtems支持阻塞任务调度,这个名字听起来有点奇怪,按照通俗的理解,就是当任务遇到IO事件或等待事件时,可以将任务设置为阻塞状态,然后将其从就绪队列移除
一、测试程序
对于阻塞任务调度,我们可以两种方式测试
- 主动等待睡眠
- 线程任务挂起
对于上面两种程序,主要是两个函数:rtems_task_suspend/rtems_task_wake_after
为了测试阻塞任务调度,本文基于rtems_task_wake_after来测试,rtems_task_suspend方法一致,就不演示了。
测试rtems_task_wake_after,可以借鉴原有的验证程序,我们可以在Process_asr函数中,将rtems_task_wake_after( RTEMS_YIELD_PROCESSOR );设置为status = rtems_task_wake_after( rtems_clock_get_ticks_per_second() );
这里tick是100为1s。修改了0为100后,rtems_task_wake_after会主动block线程,如下代码:
rtems_status_code rtems_task_wake_after(
  rtems_interval ticks
)
{
  /*
   * It is critical to obtain the executing thread after thread dispatching is
   * disabled on SMP configurations.
   */
  Thread_Control  *executing;
  Per_CPU_Control *cpu_self;

  cpu_self = _Thread_Dispatch_disable();
    executing = _Per_CPU_Get_executing( cpu_self );

    if ( ticks == 0 ) {
      _Thread_Yield( executing );
    } else {
      _Thread_Set_state( executing, STATES_WAITING_FOR_TIME );
      _Thread_Wait_flags_set( executing, THREAD_WAIT_STATE_BLOCKED );
      _Thread_Add_timeout_ticks( executing, cpu_self, ticks );
    }
  _Thread_Dispatch_direct( cpu_self );
  return RTEMS_SUCCESSFUL;
}
我们可以看到,tick是非0时,会调用_Thread_Set_state( executing, STATES_WAITING_FOR_TIME );函数,此函数加锁后调用_Thread_Set_state_locked,_Thread_Set_state_locked的函数实现如下
States_Control _Thread_Set_state_locked(
  Thread_Control *the_thread,
  States_Control  state
)
{
  States_Control previous_state;
  States_Control next_state;

  _Assert( state != 0 );
  _Assert( _Thread_State_is_owner( the_thread ) );

  previous_state = the_thread->current_state;
  next_state = _States_Set( state, previous_state);
  the_thread->current_state = next_state;

  if ( _States_Is_ready( previous_state ) ) {
    _Scheduler_Block( the_thread );
  }

  return previous_state;
}
可以发现,其先将block的state赋值给了当前状态
previous_state = the_thread->current_state;
next_state = _States_Set( state, previous_state);
the_thread->current_state = next_state;
然后如果任务状态是就绪的,则直接阻塞任务
_Scheduler_Block( the_thread );
二、阻塞任务调度实现
_Scheduler_Block的实现如下
static inline void _Scheduler_Block( Thread_Control *the_thread )
{
  Chain_Node              *node;
  const Chain_Node        *tail;
  Scheduler_Node          *scheduler_node;
  const Scheduler_Control *scheduler;
  ISR_lock_Context         lock_context;

  node = _Chain_First( &the_thread->Scheduler.Scheduler_nodes );
  tail = _Chain_Immutable_tail( &the_thread->Scheduler.Scheduler_nodes );

  scheduler_node = SCHEDULER_NODE_OF_THREAD_SCHEDULER_NODE( node );
  scheduler = _Scheduler_Node_get_scheduler( scheduler_node );

  _Scheduler_Acquire_critical( scheduler, &lock_context );
  ( *scheduler->Operations.block )(
    scheduler,
    the_thread,
    scheduler_node
  );
  _Scheduler_Release_critical( scheduler, &lock_context );

  node = _Chain_Next( node );

  while ( node != tail ) {
    scheduler_node = SCHEDULER_NODE_OF_THREAD_SCHEDULER_NODE( node );
    scheduler = _Scheduler_Node_get_scheduler( scheduler_node );

    _Scheduler_Acquire_critical( scheduler, &lock_context );
    ( *scheduler->Operations.withdraw_node )(
      scheduler,
      the_thread,
      scheduler_node,
      THREAD_SCHEDULER_BLOCKED
    );
    _Scheduler_Release_critical( scheduler, &lock_context );

    node = _Chain_Next( node );
  }
}
这里可以看到,默认情况下从本调度节点上取出Scheduler_Control,然后直接调用调度器的block函数,然后遍历所有的调度节点,逐个调用调度器的withdraw_node回调。
我们可以查看withdraw的实现如下
(gdb) p *(Scheduler_Control *)0x2d248
$18 = {context = 0x100820 <_Configuration_Scheduler_priority_dflt>, Operations = {
    initialize = 0x1eaf0 <_Scheduler_priority_Initialize>, schedule = 0x1ef10 <_Scheduler_priority_Schedule>,
    yield = 0x1f130 <_Scheduler_priority_Yield>, block = 0x1ebd0 <_Scheduler_priority_Block>,
    unblock = 0x1efd0 <_Scheduler_priority_Unblock>, update_priority = 0x1ecf0 <_Scheduler_priority_Update_priority>,
    map_priority = 0x1ea30 <_Scheduler_default_Map_priority>, unmap_priority = 0x1ea40 <_Scheduler_default_Unmap_priority>,
    ask_for_help = 0x0, reconsider_help_request = 0x0, withdraw_node = 0x0,
    make_sticky = 0x22720 <_Scheduler_default_Sticky_do_nothing>,
    clean_sticky = 0x22720 <_Scheduler_default_Sticky_do_nothing>,
    pin = 0x22760 <_Scheduler_default_Pin_or_unpin_do_nothing>,
    unpin = 0x22760 <_Scheduler_default_Pin_or_unpin_do_nothing>, add_processor = 0x0, remove_processor = 0x0,
    node_initialize = 0x1eb40 <_Scheduler_priority_Node_initialize>,
    node_destroy = 0x1ea50 <_Scheduler_default_Node_destroy>, release_job = 0x1ea60 <_Scheduler_default_Release_job>,
    cancel_job = 0x1ea70 <_Scheduler_default_Cancel_job>, start_idle = 0x1ea80 <_Scheduler_default_Start_idle>,
    set_affinity = 0x22770 <_Scheduler_default_Set_affinity>}, maximum_priority = 255, name = 1431323680,
  is_non_preempt_mode_supported = true}
这里withdraw并未实现,而且scheduler_node 是根据线程来创建的,如果只有一个线程,则scheduler_node 就一个。可以查看如下定义
#define _CONFIGURE_SCHEDULER_COUNT RTEMS_ARRAY_SIZE( _Scheduler_Table )
const size_t _Scheduler_Count = _CONFIGURE_SCHEDULER_COUNT;
所以我们在_Thread_Initialize_scheduler_and_wait_nodes可以看到如下调用
do {
......
  } while ( scheduler_index < _Scheduler_Count );
对于block的实现,实际上是将此任务从就绪队列删除。
根据我们了解rtems的调度场景,第一个可以知道的就是主动调度,它的实现是_Scheduler_Schedule,根据代码的上下文,我们可以知道,当系统发送信号的时候,如果线程的上下文是禁止抢占的,那么会主动schedule调度,让信号得以其他线程处理。本文通过实验的方式了解这种调度方式
一、信号测试代码
为了能够测试RTEMS的主动调度,我们需要测试代码如下
rtems_task Init(
  rtems_task_argument argument
)
{
  rtems_status_code status;

  TEST_BEGIN();

  Task_name[ 1 ] =  rtems_build_name( 'T', 'A', '1', ' ' );
  Task_name[ 2 ] =  rtems_build_name( 'T', 'A', '2', ' ' );

  status = rtems_task_create(
    Task_name[ 1 ],
    4,
    RTEMS_MINIMUM_STACK_SIZE * 2,
    RTEMS_DEFAULT_MODES,
    RTEMS_DEFAULT_ATTRIBUTES,
    &Task_id[ 1 ]
  );
  directive_failed( status, "rtems_task_create of TA1" );

  status = rtems_task_create(
    Task_name[ 2 ],
    4,
    RTEMS_MINIMUM_STACK_SIZE,
    RTEMS_DEFAULT_MODES,
    RTEMS_DEFAULT_ATTRIBUTES,
    &Task_id[ 2 ]
  );
  directive_failed( status, "rtems_task_create of TA2" );

  status = rtems_task_start( Task_id[ 1 ], Task_1, 0 );
  directive_failed( status, "rtems_task_start of TA1" );

  status = rtems_task_start( Task_id[ 2 ], Task_2, 0 );
  directive_failed( status, "rtems_task_start of TA2" );

  Timer_name[ 1 ] = rtems_build_name( 'T', 'M', '1', ' ' );

  status = rtems_timer_create( Timer_name[ 1 ], &Timer_id[ 1 ] );
  directive_failed( status, "rtems_timer_create of TM1" );

  rtems_task_exit();
}
为了使得task运行,我们需要实现Task_1函数
rtems_task Task_1(
  rtems_task_argument argument
)
{
  rtems_mode        previous_mode;
  rtems_status_code status;

  puts( "TA1 - rtems_signal_catch - RTEMS_INTERRUPT_LEVEL( 0 )" );
  status = rtems_signal_catch( Process_asr, RTEMS_INTERRUPT_LEVEL(0) );
  directive_failed( status, "rtems_signal_catch" );

  status = rtems_task_mode( RTEMS_NO_PREEMPT , RTEMS_PREEMPT_MASK, &previous_mode );
  printf("Kylin: previous_mode=%#x \n", previous_mode);

  puts( "TA1 - rtems_signal_send - RTEMS_SIGNAL_16 to self" );
  status = rtems_signal_send( RTEMS_SELF, RTEMS_SIGNAL_16 );
  directive_failed( status, "rtems_signal_send" );


  puts( "TA1 - rtems_task_exit" );
  rtems_task_exit();
}
根据上面代码示例,我们通过rtems_signal_catch捕捉了所有的中断源,为了让测试能够正常运行,我们通过rtems_task_mode将此task设置为不可抢占。
二、代码分析
代码分析从两个部分,一个是rtems_signal_catch,我们关注rtems_mode mode_set形参,可以留意如下
asr->mode_set = mode_set;
另一部分是rtems_signal_send函数,它调用关系如下:
rtems_signal_send--->_Thread_Add_post_switch_action--->action->handler = handler;
rtems_signal_send--->_Thread_Dispatch_enable--->_Thread_Do_dispatch--->_Thread_Run_post_switch_actions---> ( *action->handler )( executing, action, &lock_context );
这里的handler回调就是_Signal_Action_handler。此函数的主要作用为调用ASR handler,也就是注册的回调函数。指的注意的是,在调用信号处理函数之前,有如下逻辑
normal_is_preemptible = executing->is_preemptible;
executing->is_preemptible = _Modes_Is_preempt( asr->mode_set );
  if ( executing->is_preemptible && !normal_is_preemptible ) {
    Per_CPU_Control *cpu_self;

    cpu_self = _Thread_Dispatch_disable_critical( lock_context );
    _Scheduler_Schedule( executing );
    _Thread_State_release( executing, lock_context );
    _Thread_Dispatch_direct( cpu_self );
  } else {
    _Thread_State_release( executing, lock_context );
  }
( *asr->handler )( signal_set );
分析此代码可以知道,如果当前线程状态有asr设置了可抢占,但是初始化此线程时,声明是不可抢占的,满足这两个前提下,默认主动调用_Scheduler_Schedule,让出cpu。让高优先级的程序先运行一次。
通俗点的意思就是,当任务有可抢占设置为不可抢占时,在信号处理函数中,默认先调用_Scheduler_Schedule,然后由_Thread_Dispatch_direct执行当前最高优先级的任务,等最高优先级任务完成之后。再调用ASR的handler回调。因为ASR的handler的函数内是不可抢占的。
这里的asr handler函数为Process_asr,也就是使得Process_asr作为不可抢占的任务运行时,先将系统最高优先级任务运行一次。
三、测试验证
(gdb) bt
#0  _Scheduler_priority_Schedule (scheduler=0x2d268 <_Scheduler_Table>, the_thread=0x1059e0 <_RTEMS_tasks_Objects+1512>)
    at ../../../cpukit/include/rtems/score/schedulerimpl.h:108
#1  0x000000000001d5c0 in _Scheduler_Schedule (the_thread=0x1059e0 <_RTEMS_tasks_Objects+1512>)
    at ../../../cpukit/include/rtems/score/schedulerimpl.h:227
#2  _Signal_Action_handler (executing=0x1059e0 <_RTEMS_tasks_Objects+1512>, action=0x105ee8 <_RTEMS_tasks_Objects+2800>,
    lock_context=0x10eca0) at ../../../cpukit/rtems/src/signalsend.c:103
#3  0x000000000001f5f0 in _Thread_Run_post_switch_actions (executing=0x1059e0 <_RTEMS_tasks_Objects+1512>)
    at ../../../cpukit/score/src/threaddispatch.c:270
#4  _Thread_Do_dispatch (cpu_self=0x102080 <_Per_CPU_Information>, level=832)
    at ../../../cpukit/score/src/threaddispatch.c:356
#5  0x000000000001f870 in _Thread_Dispatch_enable (cpu_self=cpu_self@entry=0x102080 <_Per_CPU_Information>)
    at ../../../cpukit/score/src/threaddispatch.c:389
#6  0x000000000001d6dc in rtems_signal_send (id=id@entry=0, signal_set=signal_set@entry=65536)
    at ../../../cpukit/rtems/src/signalsend.c:205
#7  0x0000000000019728 in Task_1 (argument=<optimized out>) at ../../../testsuites/sptests/sp14/task1.c:71
#8  0x000000000001f9f0 in _Thread_Handler () at ../../../cpukit/score/src/threadhandler.c:164
#9  0x000000000001f900 in ?? ()
根据堆栈,可以知道在rtems_signal_send函数中调用_Thread_Dispatch_enable,然后根据_Thread_Do_dispatch 函数触发了_Signal_Action_handler 函数回调。在此函数回调中运行asr handler之前,默认主动调度一次。使得系统在任务从可抢占变为不可抢占前,利用最后抢占窗口重新调度。
四、扩展分析
根据上面分析,我们可以知道,我们让asr handler之前尽可能的调度一次,同样的,如果我们在信号catch函数设置asr->mode为不可抢占,那么在_Signal_Action_handler 中的线程状态就是不可抢占的,那么此次信号就不会主动发送这次调度事件。如下
rtems_task Task_1(
  rtems_task_argument argument
)
{
  rtems_mode        previous_mode;
  rtems_status_code status;

  puts( "TA1 - rtems_signal_catch - RTEMS_INTERRUPT_LEVEL( 0 )" );
  status = rtems_signal_catch( Process_asr, RTEMS_INTERRUPT_LEVEL(0) | RTEMS_NO_PREEMPT);
  directive_failed( status, "rtems_signal_catch" );

  status = rtems_task_mode( RTEMS_NO_PREEMPT , RTEMS_PREEMPT_MASK, &previous_mode );
  printf("Kylin: previous_mode=%#x \n", previous_mode);

  puts( "TA1 - rtems_signal_send - RTEMS_SIGNAL_16 to self" );
  status = rtems_signal_send( RTEMS_SELF, RTEMS_SIGNAL_16 );
  directive_failed( status, "rtems_signal_send" );

  puts( "TA1 - rtems_task_exit" );
  rtems_task_exit();
}
可以发现,我们在rtesm_signal_catch中,设置了asr→mode为不可抢占。则此次任务就会跳过主动调度。
五、总结
至此,我们通过信号来测试了rtems的主动调度函数
优先级调度算法顾名思义就是基于任务的优先级来进行调度,任何高优先级的任务都应该得到调度,本文介绍rtems的默认调度器算法优先级调度算法
一、基本数据结构
优先级调度算法默认是通过位图的方式实现O(1)的调度,其结构如下
typedef struct {
  /**
   * @brief Basic scheduler context.
   */
  Scheduler_Context Base;

  /**
   * @brief Bit map to indicate non-empty ready queues.
   */
  Priority_bit_map_Control Bit_map;

  /**
   * @brief One ready queue per priority level.
   */
  Chain_Control Ready[ RTEMS_ZERO_LENGTH_ARRAY ];
} Scheduler_priority_Context;
这里面bitmap的结构体实现如下
typedef struct {
  /**
   * @brief Each sixteen bit entry in this word is associated with one of the
   * sixteen entries in the bit map.
   */
  Priority_bit_map_Word major_bit_map;

  /**
   * @brief Each bit in the bit map indicates whether or not there are threads
   * ready at a particular priority.
   *
   * The mapping of individual priority levels to particular bits is processor
   * dependent as is the value of each bit used to indicate that threads are
   * ready at that priority.
   */
  Priority_bit_map_Word bit_map[ 16 ];
} Priority_bit_map_Control;
根据上面两个数据结构,可以知道如下:
调度器的上下文,通过Base存储,如Lock和Processor_mask
位图来控制优先级,主优先级由major_bit_map来设置,次优先级通过bit_map来设置
位图的快速查找O(1)复杂度得益于aarch64的clz指令
根据位图计算的优先级值,每个值对应一个Ready的链表
Ready存放的就是最大256个优先级的链表
由数组和链表组成的拉链能够实现快速定位最高优先级任务
二、汇编CLZ
基于优先级的调度算法的快速查找优先级的核心是clz指令,该指令从最低位遇到1之前的计算0的个数。如下
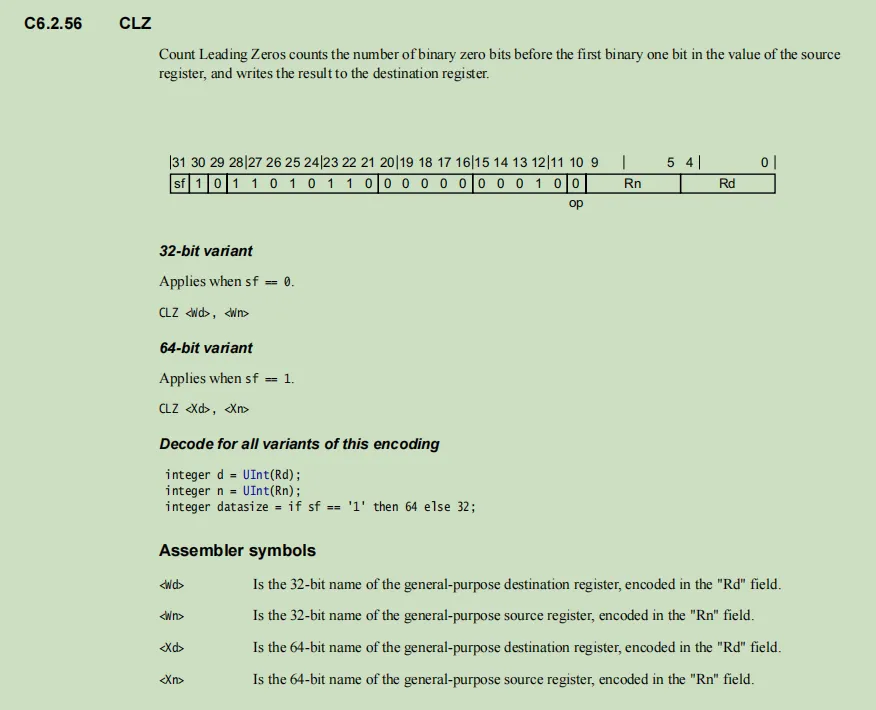
rtems使用了gnu的内置函数版本,代码如下:
static inline unsigned int _Bitfield_Find_first_bit(
  unsigned int value
)
{
  unsigned int bit_number;

#if ( CPU_USE_GENERIC_BITFIELD_CODE == FALSE )
  _CPU_Bitfield_Find_first_bit( value, bit_number );
#elif defined(__GNUC__)
  bit_number = (unsigned int) __builtin_clz( value )
    - __SIZEOF_INT__ * __CHAR_BIT__ + 16;
#else
  if ( value < 0x100 ) {
    bit_number = _Bitfield_Leading_zeros[ value ] + 8;
  } else { \
    bit_number = _Bitfield_Leading_zeros[ value >> 8 ];
  }
#endif

  return bit_number;
}
_Bitfield_Find_first_bit返回遇到1时0的个数
三、位图
对于位图的设置和更新,由于位图的特性,需要设置位图的major,然后根据major设置位图的minor。其代码如下
static inline void _Priority_bit_map_Add (
  Priority_bit_map_Control     *bit_map,
  Priority_bit_map_Information *bit_map_info
)
{
  *bit_map_info->minor |= bit_map_info->ready_minor;
  bit_map->major_bit_map |= bit_map_info->ready_major;
}
比较清晰的是major_bit_map的设置,它是直接赋值操作,而位图的minor应该由major的值来选择数组,所以需要在初始化中如下设置
函数_Priority_bit_map_Initialize_information
bit_map_info->minor = &bit_map->bit_map[ _Priority_Bits_index( major ) ];
这里可以看到,minor是取得bit_map→bit_map[x]的地址。
同样的,对于bitmap的remove,则很容易理解了,如下
static inline void _Priority_bit_map_Remove (
  Priority_bit_map_Control     *bit_map,
  Priority_bit_map_Information *bit_map_info
)
{
  *bit_map_info->minor &= bit_map_info->block_minor;
  if ( *bit_map_info->minor == 0 )
    bit_map->major_bit_map &= bit_map_info->block_major;
}
需要注意的是,这里通过位与来清楚minor和major的值,那么有一个细节如下可以留意
mask = _Priority_Mask( major );
bit_map_info->ready_major = mask;
bit_map_info->block_major = (Priority_bit_map_Word) ~mask;

mask = _Priority_Mask( minor );
bit_map_info->ready_minor = mask;
bit_map_info->block_minor = (Priority_bit_map_Word) ~mask;
这里我们位与的值实际上取反过了。所以位与可以达到清零的作用。
四、拉链
将数组和链表结合起来的拉链,其实现效果如下
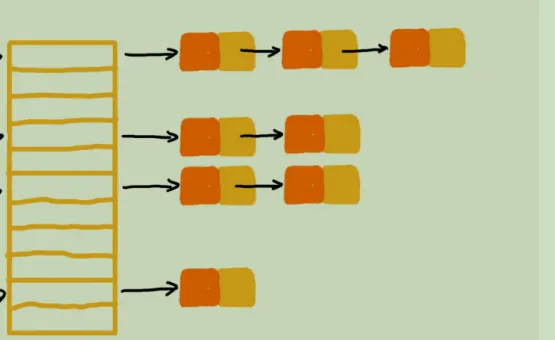
这里每个优先级对应一个数组,然后每个数组都是一个链表,链表通过队列的方式实现。也就是如下:
Chain_Control Ready[ RTEMS_ZERO_LENGTH_ARRAY ];
五、队列
管理基于优先级调度的方式是使用队列的方式,所有的插入操作都是尾插,所有的查询操作都是从头找。而链表的删除操作本身就是O(1)
则可以发现,队列实现的优先级链表的整体效率就是O(1)。代码如下
// 查找
static inline Chain_Node *_Chain_First(
  const Chain_Control *the_chain
)
{
  return _Chain_Immutable_head( the_chain )->next;
}
// 插入
static inline void _Chain_Append_unprotected(
  Chain_Control *the_chain,
  Chain_Node    *the_node
)
{
  Chain_Node *tail;
  Chain_Node *old_last;

  _Assert( _Chain_Is_node_off_chain( the_node ) );

  tail = _Chain_Tail( the_chain );
  old_last = tail->previous;

  the_node->next = tail;
  tail->previous = the_node;
  old_last->next = the_node;
  the_node->previous = old_last;
}
// 删除
static inline void _Chain_Extract_unprotected(
  Chain_Node *the_node
)
{
  Chain_Node *next;
  Chain_Node *previous;

  _Assert( !_Chain_Is_node_off_chain( the_node ) );

  next           = the_node->next;
  previous       = the_node->previous;
  next->previous = previous;
  previous->next = next;

#if defined(RTEMS_DEBUG)
  _Chain_Set_off_chain( the_node );
#endif
}
六、调度器初始化
根据上面的分析,初始化调度器就是将bitmap和数组以及链表申请并清空即可。如下
void _Scheduler_priority_Initialize( const Scheduler_Control *scheduler )
{
  Scheduler_priority_Context *context =
    _Scheduler_priority_Get_context( scheduler );

  _Priority_bit_map_Initialize( &context->Bit_map );
  _Scheduler_priority_Ready_queue_initialize(
    &context->Ready[ 0 ],
    scheduler->maximum_priority
  );
}
_Priority_bit_map_Initialize将bit_map结构之间memset即可
_Scheduler_priority_Ready_queue_initialize遍历所有的Ready数组,对每个数组进行链表初始化,因为是单链表,所以如下
static inline void _Chain_Initialize_empty(
  Chain_Control *the_chain
)
{
  Chain_Node *head;
  Chain_Node *tail;

  _Assert( the_chain != NULL );

  head = _Chain_Head( the_chain );
  tail = _Chain_Tail( the_chain );

  head->next = tail;
  head->previous = NULL;
  tail->previous = head;
}
七、调度器任务就绪
对于调度器的任务就绪,就是调用链表的插入,然后更新优先级的bitmap。那么对应函数如下
_Scheduler_priority_Ready_queue_update
_Scheduler_priority_Ready_queue_enqueue
update的作用是初始化或更新bitmap,而enqueue的作用是将ready的链表节点移除,并且通过或操作设置bitmap。如下
static inline void _Scheduler_priority_Ready_queue_update(
  Scheduler_priority_Ready_queue *ready_queue,
  unsigned int                    new_priority,
  Priority_bit_map_Control       *bit_map,
  Chain_Control                  *ready_queues
)
{
  ready_queue->current_priority = new_priority;
  ready_queue->ready_chain = &ready_queues[ new_priority ];

  _Priority_bit_map_Initialize_information(
    bit_map,
    &ready_queue->Priority_map,
    new_priority
  );
}
static inline void _Scheduler_priority_Ready_queue_enqueue(
  Chain_Node                     *node,
  Scheduler_priority_Ready_queue *ready_queue,
  Priority_bit_map_Control       *bit_map
)
{
  Chain_Control *ready_chain = ready_queue->ready_chain;

  _Chain_Append_unprotected( ready_chain, node );
  _Priority_bit_map_Add( bit_map, &ready_queue->Priority_map );
}
八、调度器任务阻塞
任务阻塞和就绪是相反的作用,先通过_Scheduler_priority_Ready_queue_extract将就绪队列的任务删除,如果就绪队列只有一个元素,则更新bitmap,清空bitmap设置,如下
static inline void _Scheduler_priority_Ready_queue_extract(
  Chain_Node                     *node,
  Scheduler_priority_Ready_queue *ready_queue,
  Priority_bit_map_Control       *bit_map
)
{
  Chain_Control *ready_chain = ready_queue->ready_chain;

  if ( _Chain_Has_only_one_node( ready_chain ) ) {
    _Chain_Initialize_empty( ready_chain );
    _Chain_Initialize_node( node );
    _Priority_bit_map_Remove( bit_map, &ready_queue->Priority_map );
  } else {
    _Chain_Extract_unprotected( node );
  }
}
九、调度器任务调度
任务调度的操作就是从ready队列取出最高优先级任务出来,然后标记执行,对应函数为_Scheduler_priority_Get_highest_ready
static inline Thread_Control *_Scheduler_priority_Get_highest_ready(
  const Scheduler_Control *scheduler
)
{
  Scheduler_priority_Context *context =
    _Scheduler_priority_Get_context( scheduler );

  return (Thread_Control *) _Scheduler_priority_Ready_queue_first(
    &context->Bit_map,
    &context->Ready[ 0 ]
  );
}
_Scheduler_priority_Ready_queue_first的作用就是在队列中取出head头节点。
十、调度器任务优先级更新
优先级更新的操作有如下四步
先将原任务从就绪队列取出 根据新的任务设置就绪队列和bitmap 如果bitmap存在,则追加的方式将此任务入队 如果bitmap不存在,则初始化就绪队列 代码实现如下
_Scheduler_priority_Ready_queue_extract(
  &the_thread->Object.Node,
  &the_node->Ready_queue,
  &context->Bit_map
);

_Scheduler_priority_Ready_queue_update(
  &the_node->Ready_queue,
  unmapped_priority,
  &context->Bit_map,
  &context->Ready[ 0 ]
);

if ( SCHEDULER_PRIORITY_IS_APPEND( new_priority ) ) {
  _Scheduler_priority_Ready_queue_enqueue(
    &the_thread->Object.Node,
    &the_node->Ready_queue,
    &context->Bit_map
  );
} else {
  _Scheduler_priority_Ready_queue_enqueue_first(
    &the_thread->Object.Node,
    &the_node->Ready_queue,
    &context->Bit_map
  );
}
十一、总结 至此,我们可以知道优先级调度算法是基于bitmap和队列实现的一种调度算法,此调度算法通过计算任务优先级来调整任务。整体效率是O(1)。
对于该调度算法而言,其是可抢占性的,并且任务是具备队列的FIFO特性的。
