在进行boot_card初始化之前,这里提前做了bsp的hook,本文分析bsp_start_hook_1的代码
一、AArch64_start_set_vector_base
这里将向量表写到异常向量表VBAR_EL1中,变量是bsp_start_vector_table_begin,如下定义
bsp_start_vector_table_begin:
.balign 0x800
Vector_table_el3:
/*
 * The exception handler for synchronous exceptions from the current EL
 * using SP0.
 */
curr_el_sp0_sync:
    sub sp, sp, #AARCH64_EXCEPTION_FRAME_SIZE           /* reserve space for CEF */
    str lr, [sp, #AARCH64_EXCEPTION_FRAME_REGISTER_LR_OFFSET]   /* shove lr into CEF */
    bl .push_exception_context_start                /* bl to CEF store routine */
/* Save original sp in x0 for .push_exception_context_finish */
    add x0, sp, #AARCH64_EXCEPTION_FRAME_SIZE           /* save original sp */
/* Push the remainder of the context */
    bl .push_exception_context_finish
/* get jump target and branch/link */
    bl curr_el_sp0_sync_get_pc      /* Get current execution address */
curr_el_sp0_sync_get_pc:            /* The current PC is now in LR */
    mov x0, #0x7f               /* Mask to use in BIC, lower 7 bits */
    bic x0, lr, x0          /* Mask LR to base of current vector */
    ldr x1, [x0,    #0x78]          /* Load target from last word in vector */
    and lr, lr, #0x780          /* Mask off bits for vector number */
    lsr lr, lr, #7              /* Shift the vector bits down */
/* Store the vector */
    str lr, [sp, #AARCH64_EXCEPTION_FRAME_REGISTER_VECTOR_OFFSET]
    mov x0, sp
    blr x1
    b twiddle
    nop
    nop
    nop
    nop
    nop
    nop
    nop
    nop
    nop
    nop
    nop
    nop
    nop
    nop
    nop
/* Takes up the space of 2 instructions */
#ifdef AARCH64_MULTILIB_ARCH_V8_ILP32
    .word _AArch64_Exception_default
    .word 0x0
#else
    .dword _AArch64_Exception_default
#endif
.balign 0x80
/* The exception handler for IRQ exceptions from the current EL using SP0. */
curr_el_sp0_irq:
    stp x0, lr, [sp, #-0x10]!   /* Push x0,lr on to the stack */
    bl curr_el_sp0_irq_get_pc   /* Get current execution address */
curr_el_sp0_irq_get_pc:         /* The current PC is now in LR */
    JUMP_HANDLER
    JUMP_TARGET_SP0
.balign 0x80
/* The exception handler for FIQ exceptions from the current EL using SP0. */
curr_el_sp0_fiq:
    stp x0, lr, [sp, #-0x10]!   /* Push x0,lr on to the stack */
    bl curr_el_sp0_fiq_get_pc   /* Get current execution address */
curr_el_sp0_fiq_get_pc:         /* The current PC is now in LR */
    JUMP_HANDLER
    JUMP_TARGET_SP0
.balign 0x80
/*
 * The exception handler for system error exceptions from the current EL using
 * SP0.
 */
curr_el_sp0_serror:
    stp x0, lr, [sp, #-0x10]!   /* Push x0,lr on to the stack */
    bl curr_el_sp0_serror_get_pc    /* Get current execution address */
curr_el_sp0_serror_get_pc:      /* The current PC is now in LR */
    JUMP_HANDLER
    JUMP_TARGET_SP0
.balign 0x80
/*
 * The exception handler for synchronous exceptions from the current EL using
 * the current SP.
 */
curr_el_spx_sync:
    msr spsel, #0                           /* switch to exception stack */
    sub sp, sp, #AARCH64_EXCEPTION_FRAME_SIZE           /* reserve space for CEF */
    str lr, [sp, #AARCH64_EXCEPTION_FRAME_REGISTER_LR_OFFSET]   /* shove lr into CEF */
    bl .push_exception_context_start                /* bl to CEF store routine */
/* Save original sp in x0 for .push_exception_context_finish */
    msr spsel, #1
    mov x0, sp
    msr spsel, #0
/* Push the remainder of the context */
    bl .push_exception_context_finish
/* get jump target and branch/link */
    bl curr_el_spx_sync_get_pc      /* Get current execution address */
curr_el_spx_sync_get_pc:            /* The current PC is now in LR */
    mov x0, #0x7f               /* Mask to use in BIC, lower 7 bits */
    bic x0, lr, x0          /* Mask LR to base of current vector */
    ldr x1, [x0,    #0x78]          /* Load target from last word in vector */
    and lr, lr, #0x780          /* Mask off bits for vector number */
    lsr lr, lr, #7              /* Shift the vector bits down */
/* Store the vector */
    str lr, [sp, #AARCH64_EXCEPTION_FRAME_REGISTER_VECTOR_OFFSET]
    mov x0, sp
    blr x1
    b twiddle
    nop
    nop
    nop
    nop
    nop
    nop
    nop
    nop
    nop
    nop
    nop
    nop
/* Takes up the space of 2 instructions */
#ifdef AARCH64_MULTILIB_ARCH_V8_ILP32
    .word _AArch64_Exception_default
    .word 0x0
#else
    .dword _AArch64_Exception_default
#endif
.balign 0x80
/*
 * The exception handler for IRQ exceptions from the current EL using the
 * current SP.
 */
curr_el_spx_irq:
    stp x0, lr, [sp, #-0x10]!   /* Push x0,lr on to the stack */
    bl curr_el_spx_irq_get_pc   /* Get current execution address */
curr_el_spx_irq_get_pc:         /* The current PC is now in LR */
    JUMP_HANDLER
    JUMP_TARGET_SPx
.balign 0x80
/*
 * The exception handler for FIQ exceptions from the current EL using the
 * current SP.
 */
curr_el_spx_fiq:
    stp x0, lr, [sp, #-0x10]!   /* Push x0,lr on to the stack */
    bl curr_el_spx_fiq_get_pc   /* Get current execution address */
curr_el_spx_fiq_get_pc:         /* The current PC is now in LR */
    JUMP_HANDLER
    JUMP_TARGET_SPx
.balign 0x80
/*
 * The exception handler for system error exceptions from the current EL using
 * the current SP.
 */
curr_el_spx_serror:
    stp x0, lr, [sp, #-0x10]!   /* Push x0,lr on to the stack */
    bl curr_el_spx_serror_get_pc    /* Get current execution address */
curr_el_spx_serror_get_pc:      /* The current PC is now in LR */
    JUMP_HANDLER
    JUMP_TARGET_SPx
.balign 0x80
/*
 * The exception handler for synchronous exceptions from a lower EL (AArch64).
 */
lower_el_aarch64_sync:
    stp x0, lr, [sp, #-0x10]!   /* Push x0,lr on to the stack */
    bl lower_el_aarch64_sync_get_pc /* Get current execution address */
lower_el_aarch64_sync_get_pc:       /* The current PC is now in LR */
    JUMP_HANDLER
    JUMP_TARGET_SPx
.balign 0x80
/* The exception handler for IRQ exceptions from a lower EL (AArch64). */
lower_el_aarch64_irq:
    stp x0, lr, [sp, #-0x10]!   /* Push x0,lr on to the stack */
    bl lower_el_aarch64_irq_get_pc  /* Get current execution address */
lower_el_aarch64_irq_get_pc:        /* The current PC is now in LR */
    JUMP_HANDLER
    JUMP_TARGET_SPx
.balign 0x80
/* The exception handler for FIQ exceptions from a lower EL (AArch64). */
lower_el_aarch64_fiq:
    stp x0, lr, [sp, #-0x10]!   /* Push x0,lr on to the stack */
    bl lower_el_aarch64_fiq_get_pc  /* Get current execution address */
lower_el_aarch64_fiq_get_pc:        /* The current PC is now in LR */
    JUMP_HANDLER
    JUMP_TARGET_SPx
.balign 0x80
/*
 * The exception handler for system error exceptions from a lower EL(AArch64).
 */
lower_el_aarch64_serror:
/* Push x0,lr on to the stack */
    stp x0, lr, [sp, #-0x10]!
/* Get current execution address */
    bl lower_el_aarch64_serror_get_pc
lower_el_aarch64_serror_get_pc:     /* The current PC is now in LR */
    JUMP_HANDLER
    JUMP_TARGET_SPx
.balign 0x80
/*
 * The exception handler for the synchronous exception from a lower EL(AArch32).
 */
lower_el_aarch32_sync:
    stp x0, lr, [sp, #-0x10]!   /* Push x0,lr on to the stack */
    bl lower_el_aarch32_sync_get_pc /* Get current execution address */
lower_el_aarch32_sync_get_pc:       /* The current PC is now in LR */
    JUMP_HANDLER
    JUMP_TARGET_SPx
.balign 0x80
/* The exception handler for the IRQ exception from a lower EL (AArch32). */
lower_el_aarch32_irq:
    stp x0, lr, [sp, #-0x10]!   /* Push x0,lr on to the stack */
    bl lower_el_aarch32_irq_get_pc  /* Get current execution address */
lower_el_aarch32_irq_get_pc:        /* The current PC is now in LR */
    JUMP_HANDLER
    JUMP_TARGET_SPx
.balign 0x80
/* The exception handler for the FIQ exception from a lower EL (AArch32). */
lower_el_aarch32_fiq:
    stp x0, lr, [sp, #-0x10]!   /* Push x0,lr on to the stack */
    bl lower_el_aarch32_fiq_get_pc  /* Get current execution address */
lower_el_aarch32_fiq_get_pc:        /* The current PC is now in LR */
    JUMP_HANDLER
    JUMP_TARGET_SPx
.balign 0x80
/*
 * The exception handler for the system error exception from a lower EL
 * (AArch32).
 */
lower_el_aarch32_serror:
/* Push x0,lr on to the stack */
    stp x0, lr, [sp, #-0x10]!
/* Get current execution address */
    bl lower_el_aarch32_serror_get_pc
lower_el_aarch32_serror_get_pc  :       /* The current PC is now in LR */
    JUMP_HANDLER
    JUMP_TARGET_SPx

bsp_start_vector_table_end:
可以看到,这里面包含了预设的一系列的异常向量表。每条向量表之间按照0x80对齐。
二、_SMP_Get_current_processor
这里获取当前的处理器index,如下
uint32_t _CPU_SMP_Get_current_processor( void )
{
  return _Per_CPU_Get_index( _CPU_Get_current_per_CPU_control() );
}
这里对于_CPU_Get_current_per_CPU_control,如下实现
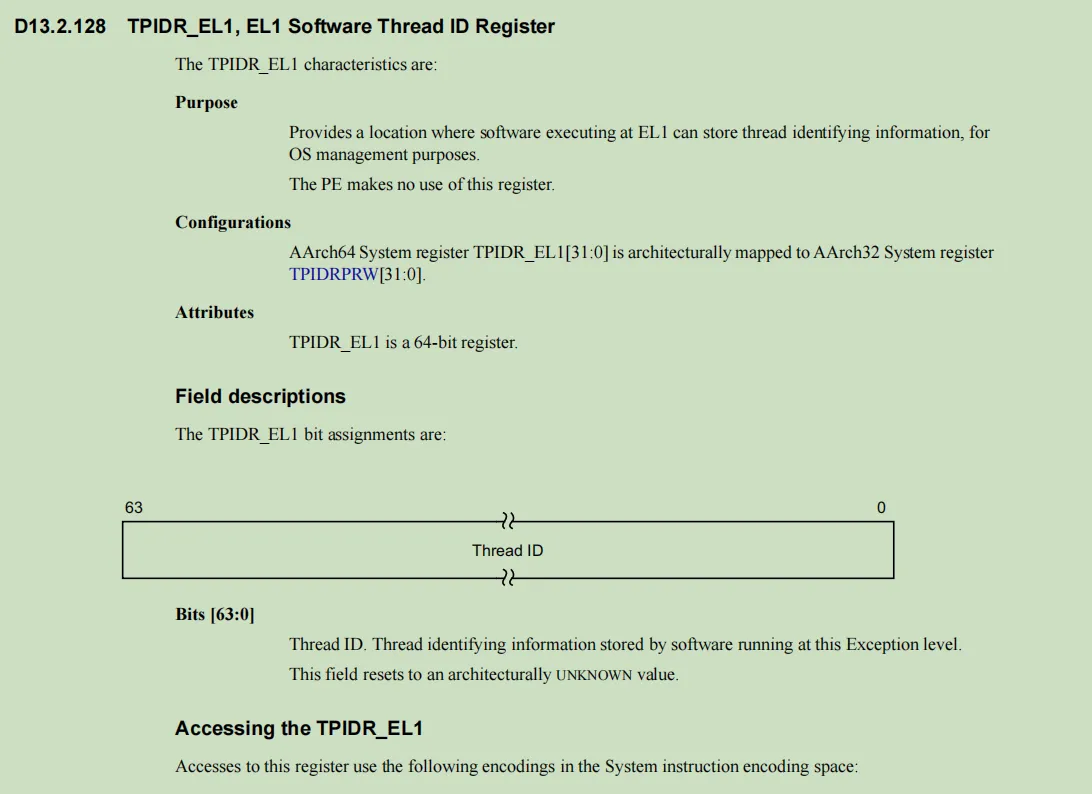
static inline
struct Per_CPU_Control *_AARCH64_Get_current_per_CPU_control( void )
{
  struct Per_CPU_Control *cpu_self;
  uint64_t value;

  __asm__ volatile (
    "mrs %0, TPIDR_EL1" : "=&r" ( value ) : : "memory"
  );

  /* Use EL1 Thread ID Register (TPIDR_EL1) */
  cpu_self = (struct Per_CPU_Control *)(uintptr_t)value;

  return cpu_self;
}
这里获取了TPIDR_EL1寄存器的值
而对于_Per_CPU_Get_index,实现如下:
static inline uint32_t _Per_CPU_Get_index( const Per_CPU_Control *cpu )
{
#if defined(RTEMS_SMP)
  const Per_CPU_Control_envelope *per_cpu_envelope =
    ( const Per_CPU_Control_envelope * ) cpu;

  return ( uint32_t ) ( per_cpu_envelope - &_Per_CPU_Information[ 0 ] );
#else
  (void) cpu;
  return 0;
#endif
}
这里拿cpu_self 减去 &_Per_CPU_Information[ 0 ],这里取了_Per_CPU_Information[ 0 ] 的地址,也就是_Per_CPU_Information的地址, 我们看如下代码
ldr x1, =_Per_CPU_Information
add x1, x1, x0, lsl #PER_CPU_CONTROL_SIZE_LOG2 # 10
msr TPIDR_EL1, x1
这里x0从mpidr_el1获得
mpidr_el1在Aarch64寄存器介绍提过,0xff获得cpu的亲和性,代码如下
FUNCTION_ENTRY(_AArch64_Get_current_processor_for_system_start)

  /* Return the affinity level 0 reported by the MPIDR_EL1 */
  mrs x0, mpidr_el1
  and x0, x0, #0xff
  ret

FUNCTION_END(_AArch64_Get_current_processor_for_system_start)
这里x0是0,对于
add x1, x1, x0, lsl #10
可以知道 x1 = x1 + x0 << 10。这里x1还是x1, 也就是_Per_CPU_Information的地址。
所以_CPU_SMP_Get_current_processor 返回了0
三、zynqmp_setup_mmu_and_cache
首先需要留意的是aarch64_mmu_setup,代码如下:
BSP_START_TEXT_SECTION static inline void aarch64_mmu_setup( void )
{
  /* Set TCR */
  /* 256TB/48 bits mappable (64-0x10) */
  _AArch64_Write_tcr_el1(
    AARCH64_TCR_EL1_T0SZ( 0x10 ) | AARCH64_TCR_EL1_IRGN0( 0x1 ) |
    AARCH64_TCR_EL1_ORGN0( 0x1 ) | AARCH64_TCR_EL1_SH0( 0x3 ) |
    AARCH64_TCR_EL1_TG0( 0x0 ) | AARCH64_TCR_EL1_IPS( 0x5ULL ) |
    AARCH64_TCR_EL1_EPD1
  );

  /* Set MAIR */
  _AArch64_Write_mair_el1(
    AARCH64_MAIR_EL1_ATTR0( 0x0 ) | AARCH64_MAIR_EL1_ATTR1( 0x4 ) |
    AARCH64_MAIR_EL1_ATTR2( 0x44 ) | AARCH64_MAIR_EL1_ATTR3( 0xFF )
  );
}
tcr可以查看Aarch64的TCR寄存器介绍解释
mair_el1内存属性寄存器,可以查看:Aarch64的MAIR寄存器介绍
我们可以知道mair_el1的值是0xffffffffff440400。可以计算如下:
AARCH64_MAIR_EL1_ATTR0( 0x0 ) : Device-nGnRnE

AARCH64_MAIR_EL1_ATTR1( 0x4 ) : Device-nGnRE
AARCH64_MAIR_EL1_ATTR2( 0x44 ) : Normal-Inner+Outer Non-cacheable

AARCH64_MAIR_EL1_ATTR3( 0xFF ) : Normal-Inner+Outer  Write-Back Non-transient  Inner+Outer Read-Allocate, Inner+Outer Write-Allocate.
对于aarch64_mmu_setup_translation_table函数,实现如下:
BSP_START_TEXT_SECTION void aarch64_mmu_setup_translation_table(
  aarch64_mmu_control *control,
  const aarch64_mmu_config_entry *config_table,
  size_t config_count
)
{
  size_t i;

  aarch64_mmu_page_table_set_blocks(
    control->ttb,
    (uintptr_t) NULL,
    MMU_MAX_SUBTABLE_PAGE_BITS,
    0
  );

  /* Configure entries required for each memory section */
  for ( i = 0; i < config_count; ++i ) {
    rtems_status_code sc;

    sc = aarch64_mmu_set_translation_table_entries( control, &config_table[i] );

    if ( sc != RTEMS_SUCCESSFUL ) {
      bsp_fatal( AARCH64_FATAL_MMU_CANNOT_MAP_BLOCK );
    }
  }
}
此函数设置mmu的一级页表,这里本地变量解析如下:
page_table: ttb
base: 0
bit_offset: 39
page_flag: 0
default_attr: 0
MMU_BITS_PER_LEVEL: 每级页表占9bit
对于for ( uint64_t i = 0; i < ( 1 << MMU_BITS_PER_LEVEL ); i++ ) 而言
这里 i 是 0-511 (bits=9)
对于page_table[i] = base | ( i << bits_offset );
base | i < 39 将512个页表index设置到bit39-48上
page_table[i] |= default_attr | page_flag; 为一级页表设置默认属性和flag
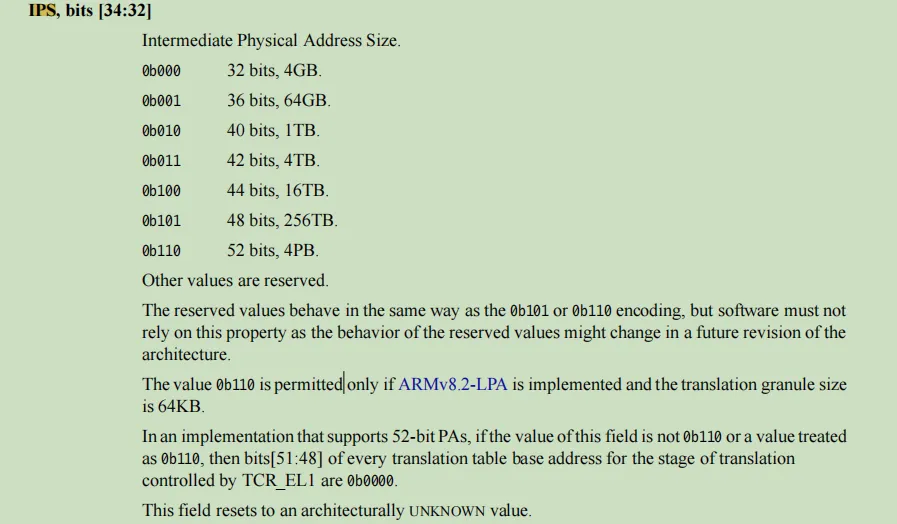
ID_AA64MMFR0_EL1寄存器查询设置的物理地址范围
我们留意parange
对于代码,我们可以知道id_reg是0x0010。则max_mappable是 1 << 40 也就是 0x10000000000
3.2 aarch64_mmu_map_block
这里调用aarch64_mmu_map_block,我们查看如下:
return aarch64_mmu_map_block(
  control,
  control->ttb,
  0x0,
  begin,
  size,
  -1,
  config->flags
);
参数解析如下:
control: aarch64_mmu_instance
ttb: bsp_translation_table_base
root_address: 0
addr: aarch64_mmu_config_table→begin
size: aarch64_mmu_config_table size
level: -1
flag: aarch64_mmu_config_table->flag
值得注意的是,此函数会递归调用(aarch64_mmu_map_block)进行页表映射,到pte后为实际物理地址, 如下:
page_table[index] = addr | flags | page_flag;
这里关于ttbrx到物理地址的查询步骤,可以看我的其他文章,这里不赘述
3.3 aarch64_mmu_enable
这里主要关注如下寄存器
TTBR0_EL1
SCTLR_EL1
对于TTBR0_EL1,这里将ttb写入ttbr0_el1
对于SCTLR_EL1。做了如下位与
sctlr |= AARCH64_SCTLR_EL1_I | AARCH64_SCTLR_EL1_C | AARCH64_SCTLR_EL1_M;
四、bsp_start_clear_bss
这里直接memset将bss段清空,如下
BSP_START_TEXT_SECTION static inline void bsp_start_clear_bss(void)
{
  memset(bsp_section_bss_begin, 0, (size_t) bsp_section_bss_size);
}
五、总结
至此,关于进入bootcard前的bsp_start_hook_1流程介绍完毕
根据之前的了解,我们知道了rtems启动需要经过多个步骤,现在我们根据代码分析,记录一下初始化流程
一、总流程
总流程在函数rtems_initialize_executive中,其实现如下:
void rtems_initialize_executive(void)
{
  const rtems_sysinit_item *item;

  /* Invoke the registered system initialization handlers */
  RTEMS_LINKER_SET_FOREACH( _Sysinit, item ) {
    ( *item->handler )();
  }

  _Syst_Malloc_Initializeem_state_Set( SYSTEM_STATE_UP );

  _SMP_Request_start_multitasking();

  _Thread_Start_multitasking();

  /*******************************************************************
   *******************************************************************
   *******************************************************************
   ******                 APPLICATION RUNS HERE                 ******
   ******              THE FUNCTION NEVER RETURNS               ******
   *******************************************************************
   *******************************************************************
   *******************************************************************/
}
故分析可知,其主要调用如下:
_Workspace_Handler_initialization
_Malloc_Initialize
bsp_start
zynq_uart_kernel_init
_User_extensions_Handler_initialization
rtems_initialize_data_structures
_Scheduler_Ensure_exactly_one_processor
_RTEMS_tasks_Manager_initialization
_Thread_Create_idle
bsp_r1_heap_extend
rtems_libio_init
rtems_filesystem_initialize
_Console_simple_Initialize
_RTEMS_tasks_Initialize_user_task
rtems_libio_post_driver
_SMP_Request_start_multitasking
_Thread_Start_multitasking
二 __Workspace_Handler_initialization
初始化堆工作区
_Workspace_Handler_initialization
  _Workspace_Initialize_for_one_area
    _Heap_Initialize
      _Heap_Get_first_and_last_block
三 __Malloc_Initialize
初始化malloc
_Malloc_Initialize
  _Malloc_Initialize_for_one_area
    _Heap_Initialize
      _Heap_Get_first_and_last_block
四、bsp_start
bsp主要初始化中断向量表和增加一致性cache区域,并初始化ecc
bsp_start
  bsp_interrupt_initialize
    bsp_interrupt_facility_initialize
      AArch64_set_exception_handler
        AArch64_get_vector_base_address
          VBAR_EL1
          *vector_address = handler;
            /* Execution template:
             Save volatile regs on interrupt stack
             Execute irq handler
             Restore volatile regs from interrupt stack
             Return to embedded exception vector code
            */
            _AArch64_Exception_interrupt_nest
              AArch64_Interrupt_Handler
                bsp_interrupt_dispatch
                  bsp_interrupt_handler_dispatch_unchecked
                    bsp_interrupt_dispatch_entries
                      ( *entry->handler )( entry->arg );
            /* Execution template:
             Save volatile registers on thread stack(some x, all q, ELR, etc.)
             Switch to interrupt stack
             Execute interrupt handler
             Switch to thread stack
             Call thread dispatch
             Restore volatile registers from thread stack
             Return to embedded exception vector code
            */
            _AArch64_Exception_interrupt_no_nest
              AArch64_Interrupt_Handler
              _AArch64_Exception_thread_dispatch
  rtems_cache_coherent_add_area
    add_area
      _Heap_Initialize
        _Heap_Get_first_and_last_block
  zynqmp_ecc_init
五、zynq_uart_kernel_init
串口初始化,这里后面的字符输出通过zynq_uart_kernel_output_char回调到每个字符的输出
zynq_uart_kernel_init
  zynq_uart_initialize
  zynq_uart_kernel_output_char
六、_User_extensions_Handler_initialization
用户扩展的初始化handler,因为默认没有,故不分析
_User_extensions_Handler_initialization
  _Chain_Append_unprotected
七、rtems_initialize_data_structures
这里完成cpu,thread,isr,scheduler,smp的初始化
rtems_initialize_data_structures
  _CPU_Initialize
  _Thread_Dispatch_initialization
  _ISR_Handler_initialization
  _Thread_Handler_initialization
  _Scheduler_Handler_initialization
    _Scheduler_priority_Initialize
      _Scheduler_priority_Ready_queue_initialize
  _SMP_Handler_initialize
    _CPU_SMP_Finalize_initialization
      rtems_interrupt_entry_install # IPI 为bsp_inter_processor_interrupt
        bsp_interrupt_entry_install
          bsp_interrupt_entry_install_first
八、_Scheduler_Ensure_exactly_one_processor
这里只是断言了cpu为1个
九、_RTEMS_tasks_Manager_initialization
_RTEMS_tasks_Manager_initialization
  _Thread_Initialize_information
  _User_extensions_Add_API_set
    _User_extensions_Add_set
十、_Thread_Create_idle
创建idle线程
_Thread_Create_idle
  _Thread_Create_idle_for_CPU
    _Thread_Initialize
      _Thread_Try_initialize
        _User_extensions_Thread_create # 创建线程
    cpu->executing = idle;
  _System_state_Set( SYSTEM_STATE_BEFORE_MULTITASKING );
十一、bsp_r1_heap_extend
扩展的heap
十二、rtems_libio_init
libio初始化
十三、rtems_filesystem_initialize
imfs的初始化,设置root
rtems_filesystem_initialize
  mount
    register_root_file_system
  mkdir
    mknod
      rtems_filesystem_mknod
        IMFS_mknod
十四、_Console_simple_Initialize
添加/dev/console
_Console_simple_Initialize
  IMFS_add_node
十五、_RTEMS_tasks_Initialize_user_task
设置Init函数
_RTEMS_tasks_Initialize_user_task # _RTEMS_tasks_User_task_table/Init
  rtems_task_create
    _RTEMS_tasks_Create
      _RTEMS_tasks_Allocate
      _Thread_Initialize
十六、rtems_libio_post_driver
rtems_libio_post_driver
  open # /dev/console
十七、_SMP_Request_start_multitasking
等待状态PER_CPU_STATE_READY_TO_START_MULTITASKING
SYSTEM_STATE_UP
_SMP_Request_start_multitasking
  _SMP_Wait_for_ready_to_start_multitasking
    _SMP_Try_to_process_message
      _SMP_Process_message SMP_MESSAGE_SHUTDOWN/SMP_MESSAGE_PERFORM_JOBS/SMP_MESSAGE_FORCE_PROCESSING
十八、_Thread_Start_multitasking
启动线程任务
_Thread_Start_multitasking
  _CPU_Start_multitasking
    _AArch64_Start_multitasking
      .L_check_is_executing
        .L_restore
          ldp fp,  lr,  [x1, #0x50] # _CPU_Context_switch_no_return
            _Thread_Handler
              _Thread_Entry_adaptor_numeric
                Init
十九、总结
至此,我们完成了rtems的全部的启动流程,可以看到,最后_Thread_Start_multitasking会主动回调在rtems_task_start传入的adaptor函数指针,而这个指针指向Init函数。操作系统启动完成。
有些寄存器不太清晰,这里通过aarch64的芯片体系架构规范查询后留作记录,方便记忆
一、CurrentEL寄存器
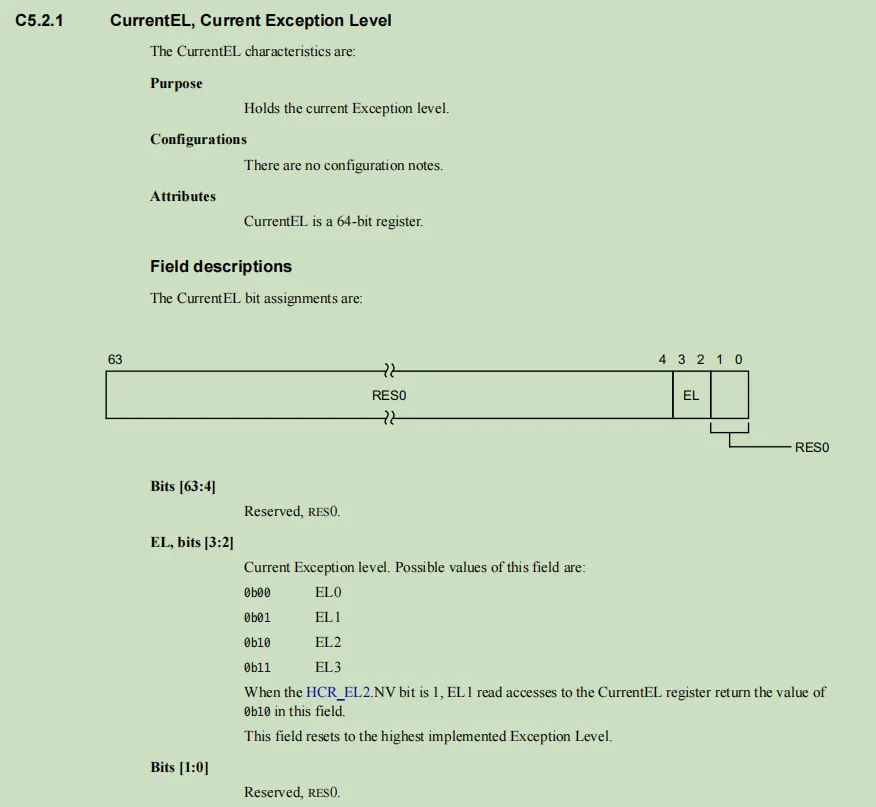
这里bit[2:3]判断当前处理elX。
二、SCTLR_EL1寄存器
系统控制寄存器,包括内存相关的控制
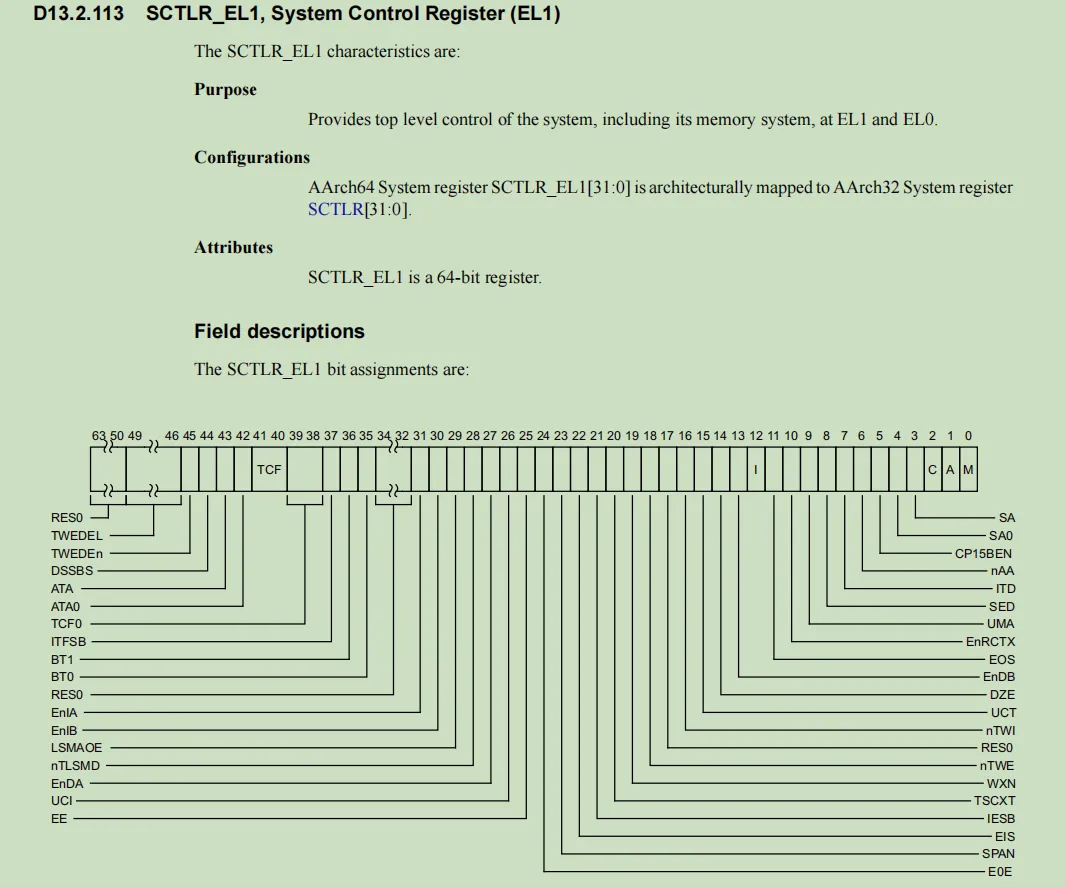
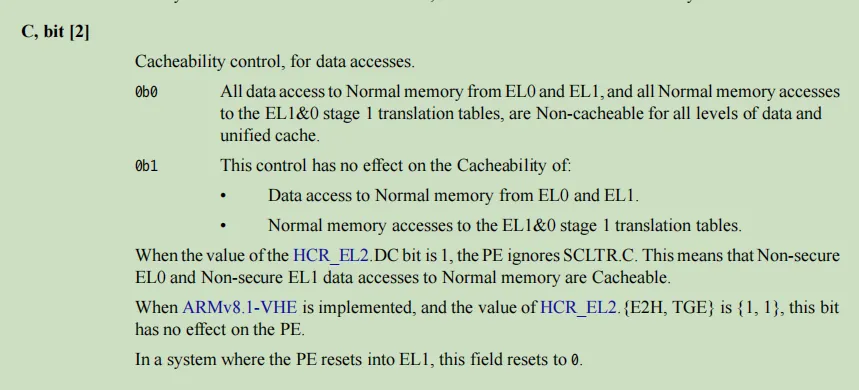
这里需要注意I,C,M位分别是
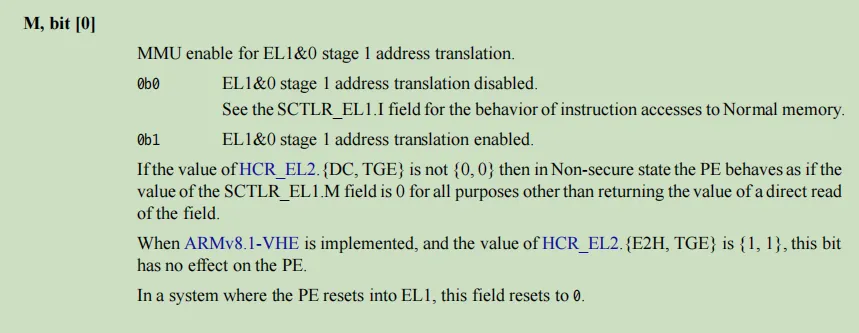
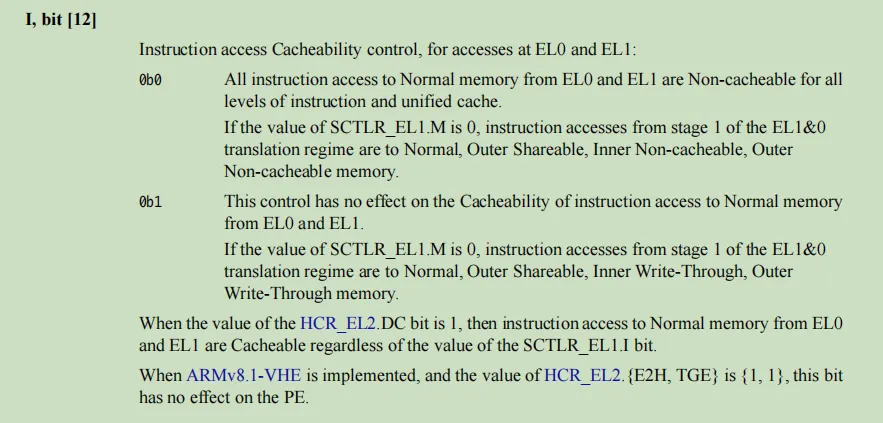
- M 开启MMU传输
- C 开启Cacheability
- I 开启指令Cacheability
三、TPIDR_EL1寄存器
用于保持内核级的线程结构指针
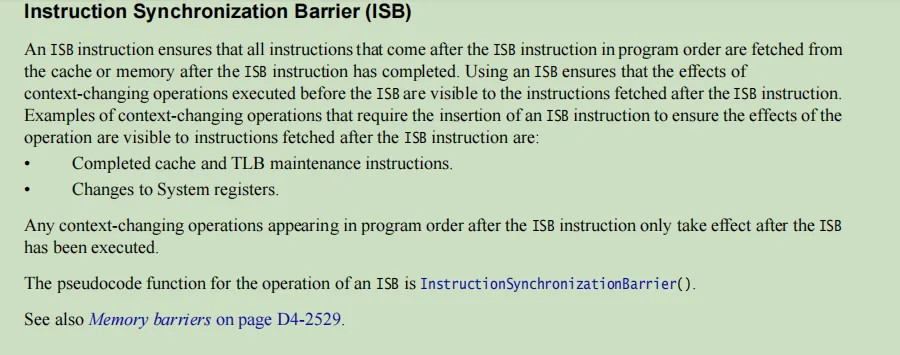
四、isb寄存器
内存屏障指令
五、mpidr_el1寄存器
获取cpu亲和性寄存器
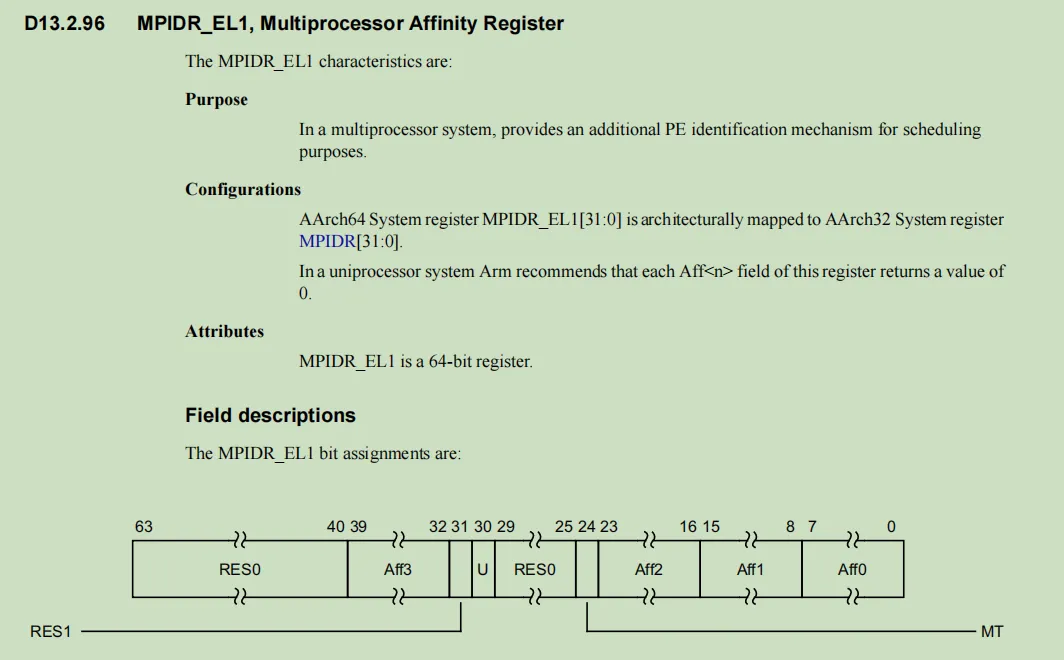
这里bit[7:0]是PE下的亲和性寄存器值

六、ID_AA64MMFR0_EL1寄存器
此寄存器可以查询设置的物理地址范围,寄存器描述如下:
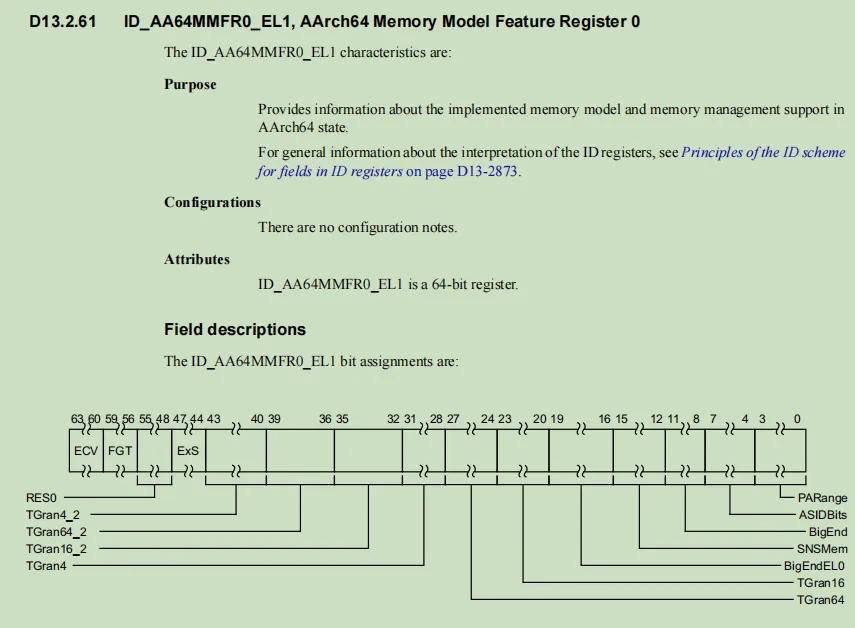
我们留意parange,如下解释
TCR寄存器是Translation Control Register,这里用来控制虚拟地址到物理地址转换的一些特性,本文介绍其中一些bit的含义
一、TCR_EL1寄存器
其寄存器描述如下:
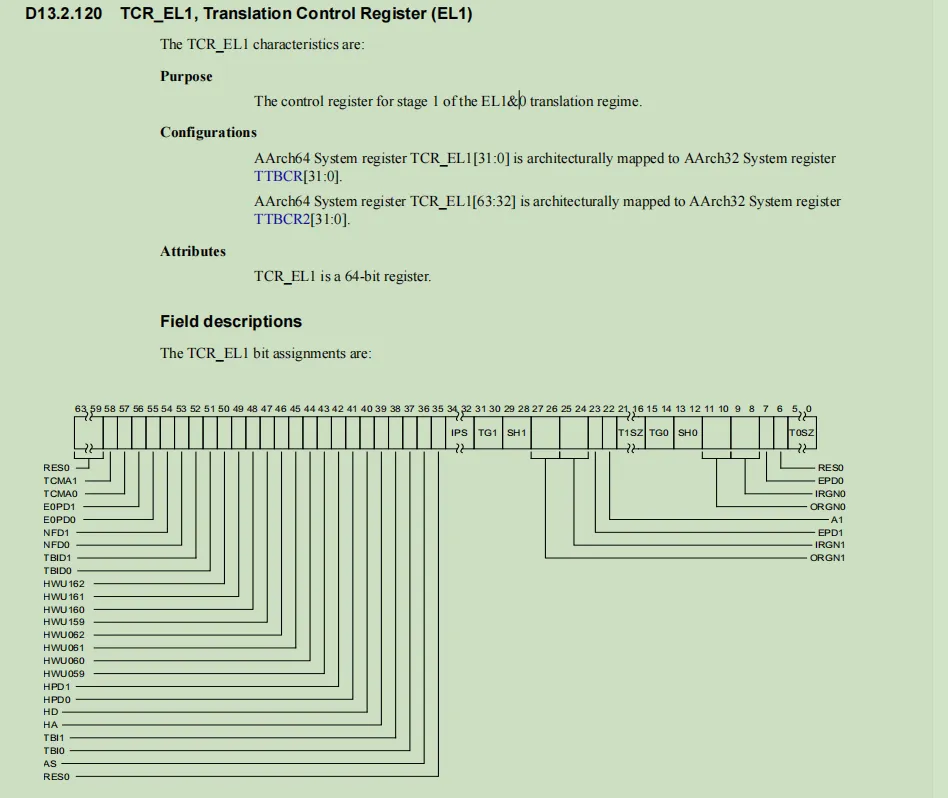
这里TCR_EL1用作EL1下的虚拟地址到物理地址转换信息,能够设置虚拟地址大小,页表格式,缓存策略,访问权限等。下面详细介绍一些位
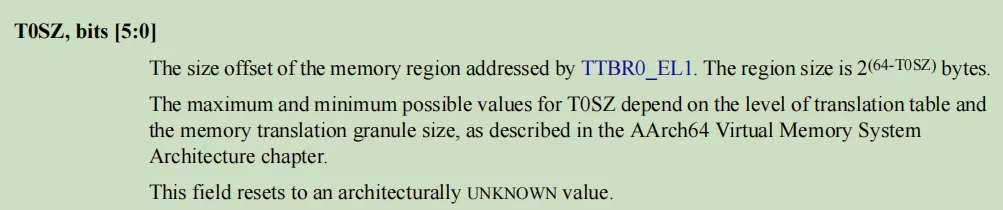
二、T0SZ
T0SZ用作设置ttbr0的size,顾名思义,具体解释如下
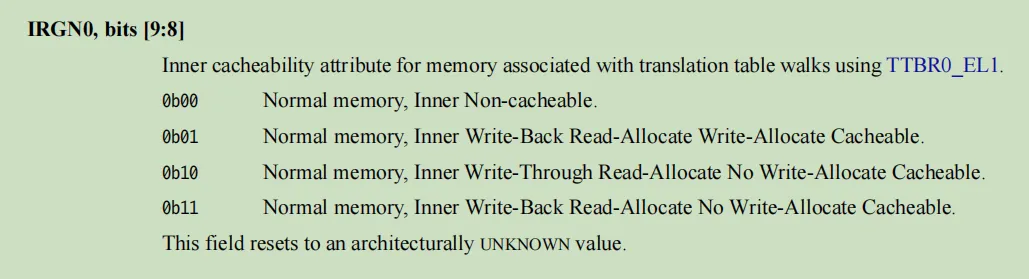
三、irgn0
配置inner内存属性为 如果是1,则是write-back,read-allocate,write-allocate cacheable 。
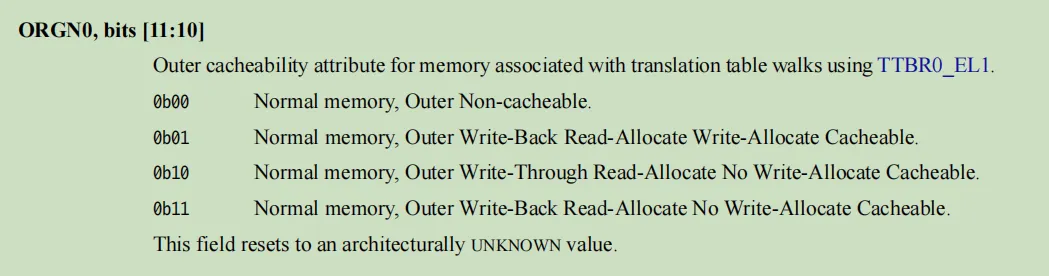
四、orgn0
orgn0 是配置outer 如果是1 则内存属性为 write-back,read-allocate,write-allocate cacheable 。
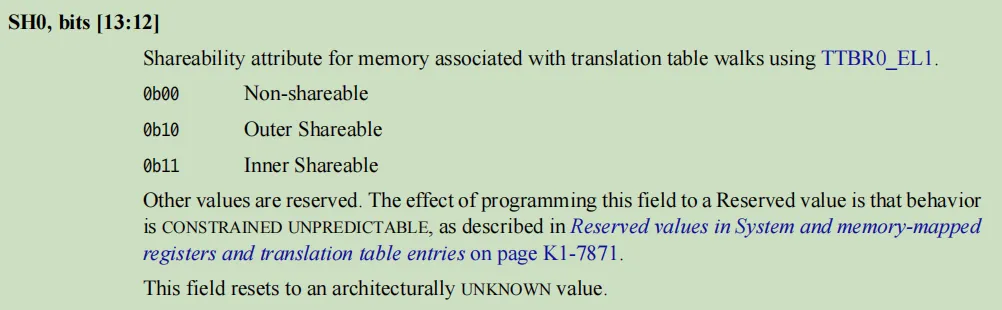
五、sh0
配置cache的模式,如果是11则为inner shareable
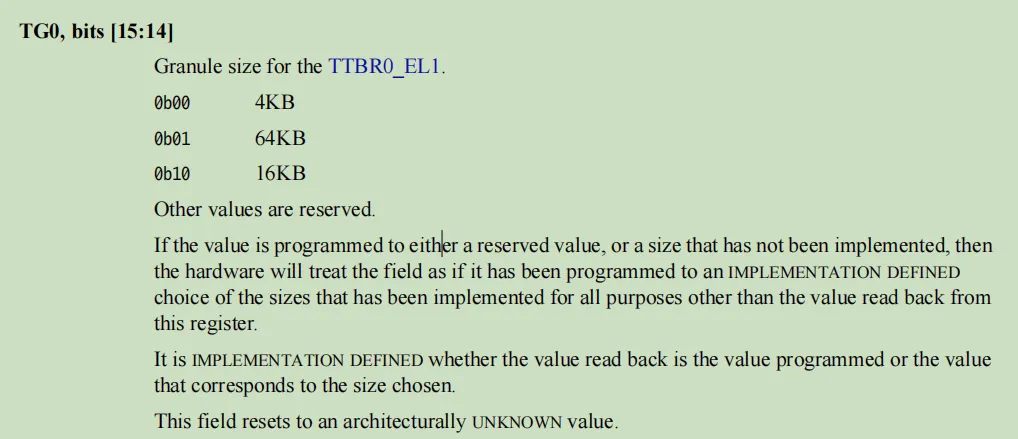
六、tg0
配置虚拟地址页面大小,如果是00,则是4k
七、ips
配置物理地址大小,如果是0x101则 48bit 256TB
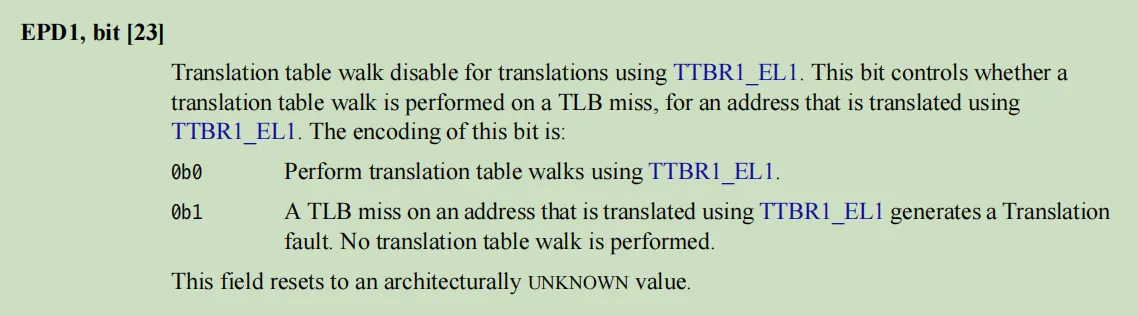
八、epd1
配置tlb miss后,是否遍历ttbrx,还是触发translation fault
aarch64中,有一个专门配置内存属性表的寄存器,为MAIR,本文基于MAIR寄存器讲解其作用
一、内存属性寄存器
对于虚拟内存地址,我们知道其分布如下
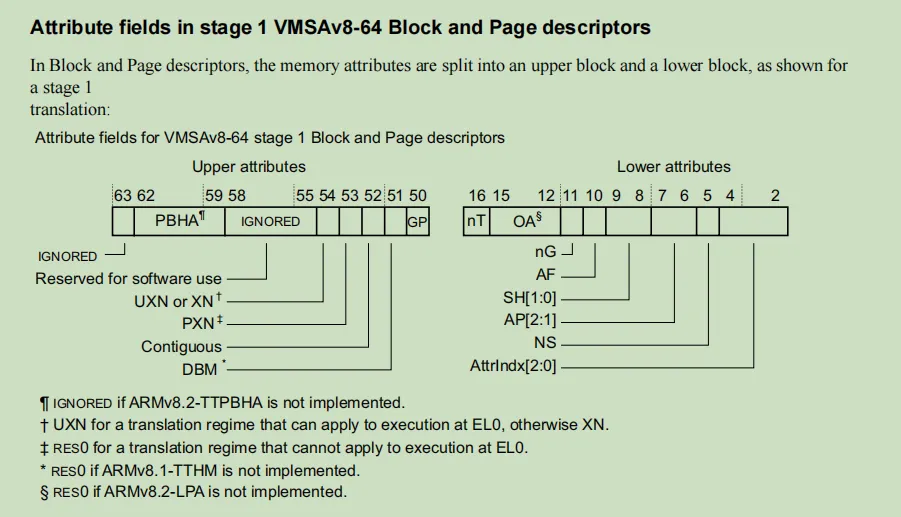
这里我们只关注AttrIndx[2:0],可以知道描述如下:

这里stage 1就说ttbrx到pte的过程,这里的bits [4:2]指示的是MAIR寄存器中attr的索引。而MAIR寄存器如下 以el1为例
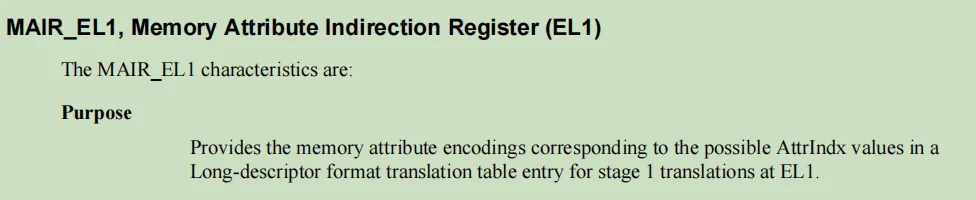
这里mair有8个attr,如下
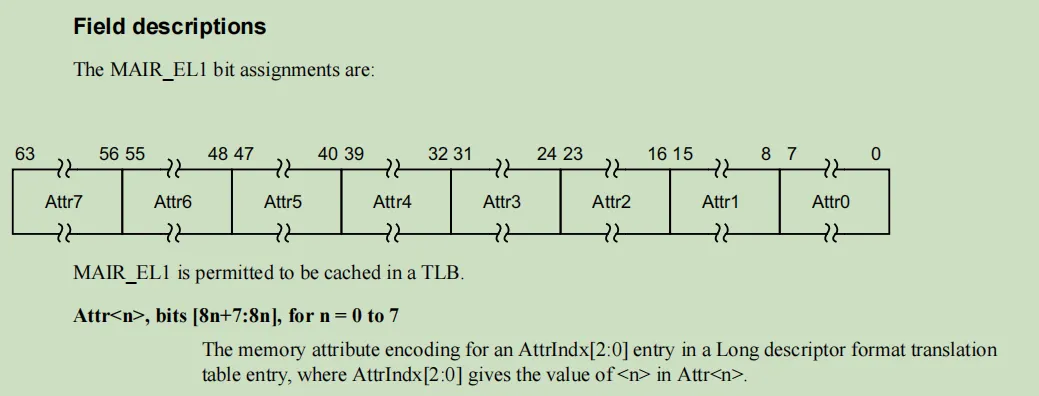
这里的attr的值含义如下
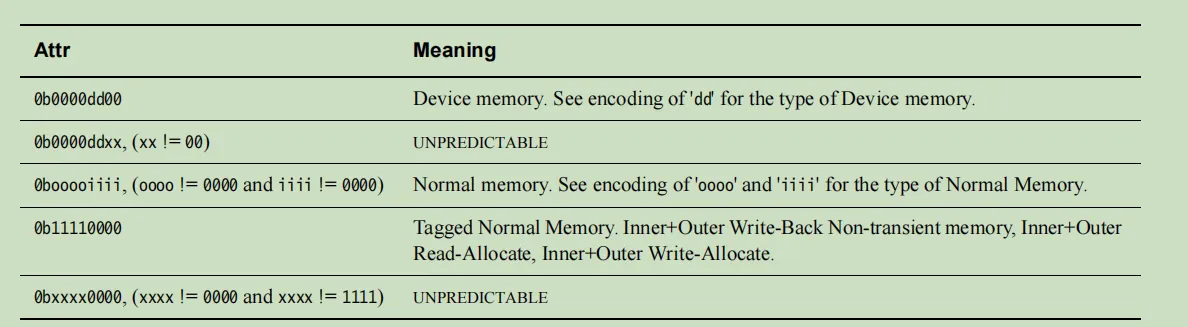
其中熟悉可以分为设备内存和正常内存,如下
- Device Memory
- Normal Memory
通过dd位区分,如下
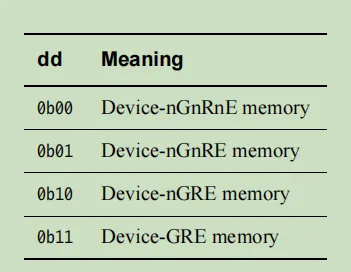
这里我们看到GRE三个概念,解释如下
- G: Gathering 是否可合并。 表示对多个memory的访问是否可以合并,如果是nG,表示处理器必须严格按照代码中内存访问来进行,不能把两次访问合并成一次
- R: Reordering 是否可指令重排 表示是否允许处理器对内存访问指令进行重排。nR表示必须严格执行program order。
- E: Early Write Acknowledgement 是否提前写应答 表示对于write而言的ack时机,为了加快写的速度,系统的中间环节可能会设定一些write buffer。nE表示写操作的ack必须来自最终的目的地而不是中间的write bufferr。
关于memory的shareable补充如下:
在TCR_EL1寄存器中,关注sh1 bit[29:28]如下:
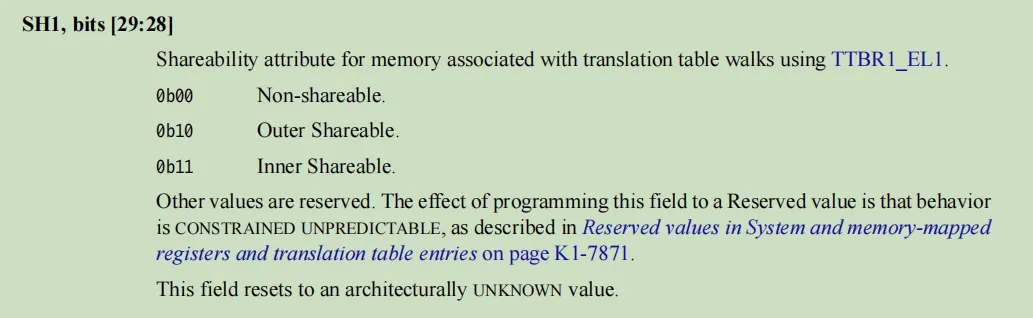
这里可以看到
对于aarch64,cpu按照cluster划分,根据cluster的share规则如下
- Non-shareable : cpu之间完全不共享
- Inner-shareable : cpu之间,如果在一个cluster内,共享
- outer-shareable : cpu之间,可以在不同cluster上共享
这里的inner指的是一个cluster内,outer指的非一个cluster内
而对于Normal Memory,通过0booooiiii来区分,如下解释
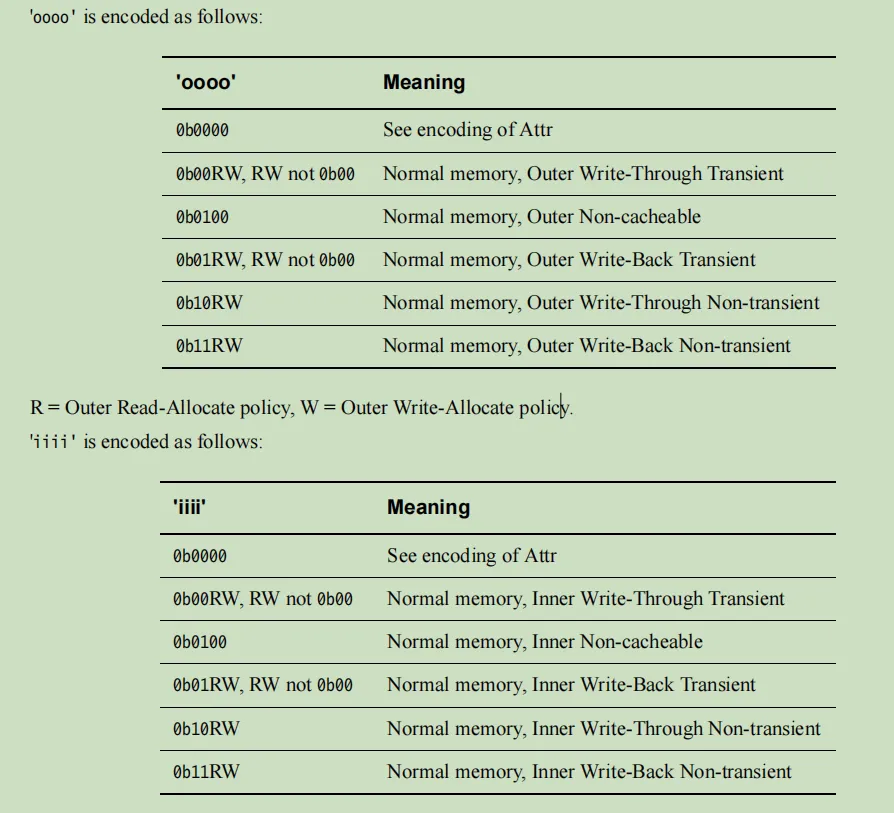
这里oooo是高位,iiii是低位。可以看到,这里对于Normal memory而言,我们看到了cacheable的如下属性
- write-through transient: 短暂写通
- write-back transient : 短暂写回
- write-through: 写通
- write-back:写回
这里写通指的是内存写操作,直接更新到缓存和内存中,也就是缓存和内存数据是一致的
这里写回指的是内存写操作,只更新到缓存中,推迟对内存的更新,直到该缓存行被替换时才写回内存,这种情况下我们可以跟踪dirty bit,如果脏位是1,则缓存和内存的数据不一致
处理cacheable的write方式,还有transient 标志位
- transient 指的是短暂标志
如果带有transient ,则表示内存使用时间很短,可以利用此标志来优先更新cache line
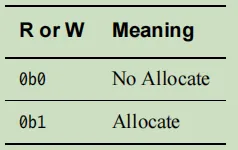
除了这些,我们还可以注意到RW标志,如下解释
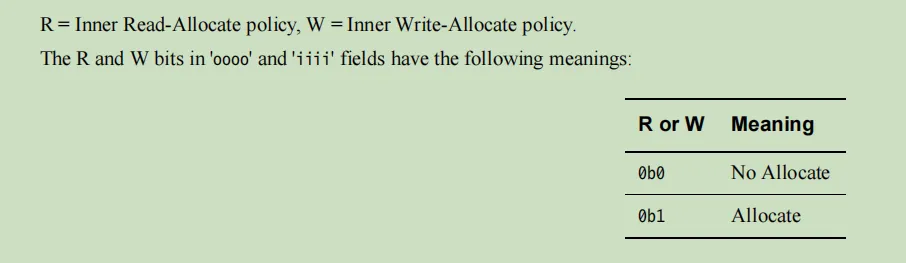
这里的RW分别是 Read-allocate和Write-allocate,解释如下:
- Read-Allocate: CPU Read data from Main Memory and Allocate it in cache
read的时候,如果出现miss,则从内存中读取数据,然后申请一个cache line,并记录
- Write-Allocate: CPU Write data to Main Memory and Allocate it in Cache.
write的时候,如果出现miss,先写到内存中,然后申请一个cache line,并记录
如果都是0,则代表No allocate,解释如下
- No Read-Allocate: 读miss时,直接读内存中,不加载到cache
- No Write-Allocate: 写miss时,直接写到内存中,不加载到cache
二、示例计算
假设我设置的MAIR_EL1的值是0xffffffffff440400,这里计算如下
- attr0:0x0
- attr1:0x4
- attr2:0x44
- attr3:0xff
2.1 计算attr0

可以知道,dd也是00,便知道这里是如下:
- Device-nGnRnE memory
也就是 设备内存,不执行合并,不执行指令重排,不执行提前写应答
2.2 计算attr1
可以知道,dd是01,便知道如下:
- Device-nGnRE memory
也就是 设备内存,不执行合并,不执行指令重排,可以提前写应答
2.3 计算attr2
0x44,对应如下

对于oooo如下:

对于iiii如下:

也就是 正常内存,cluster内和cluster之间 都是non-cacheable的,所以的读写操作都是没有cache的。
2.4 计算attr3
0xff,对于如下
对于oooo如下:

对于iiii如下:

这里rw也是11,如下解释
这里是 正常内存,非短暂内存,读 allocate, 写 allocate。 简单来说就是所有的内存带cache,读写操作都经过cache
