在Linux系统中,strace命令是一个集诊断、调试、统计与一体的工具,可用来追踪调试程序,能够与其他命令搭配使用,接下来就Linux系统调用工具strace的使用方法和实践给大家做个详细介绍,一起来了解下strace的操作实例吧。
一、场景
1、在操作系统运维中会出现程序或系统命令运行失败,通过报错和日志无法定位问题根因。
2、如何在没有内核或程序代码的情况下查看系统调用的过程。
说明
1、strace是有用的诊断,说明和调试工具,Linux系统管理员可以在不需要源代码的情况下即可跟踪系统的调用。
2、strace显示有关进程的系统调用的信息,这可以帮助确定一个程序使用的哪个函数,当然在系统出现问题时可以使用 strace定位系统调用过程中失败的原因,这是定位系统问题的很好的方法。
参数解析
strace安装方法:
# apt-get install strace –y
strace的常用参数及示例
-c
统计每一系统调用的所执行的时间,次数和出错的次数等。
示例:打印执行uptime时系统系统调用的时间、次数、出错次数和syscall
# strace -c uptime
-d
显示有关标准错误的strace本身的一些调试输出。
-f
跟踪子进程,这些子进程是由于fork(2)系统调用而由当前跟踪的进程创建的。
-i
在系统调用时打印指令指针。
-t
跟踪的每一行都以时间为前缀。
-tt
如果给出两次,则打印时间将包括微秒。
-ttt
如果给定三次,则打印时间将包括微秒,并且前导部分将打印为自该XX以来的秒数。
-T
显示花费在系统调用上的时间。这将记录每个系统调用的开始和结束之间的时间差。
-v
打印环境,统计信息,termios等调用的未缩写版本。这些结构在调用中非常常见,因此默认行为显示了结构成员的合理子集。使用此选项可获取所有详细信息。
-V
打印strace的版本号。
-e expr
限定表达式,用于修改要跟踪的事件或如何跟踪它们:
-e trace=set
仅跟踪指定的系统调用集。该-c选项用于确定哪些系统调用可能是跟踪有用有用。例如,trace=open,close,read,write表示仅跟踪这四个系统调用。
-e trace=file
跟踪所有以文件名作为参数的系统调用。
示例:打印执行ls时跟文件有关的系统调用。
# strace -e trace=file ls
-e trace=process
跟踪涉及过程管理的所有系统调用。这对于观察进程的派生,等待和执行步骤很有用。
-e trace=network
跟踪所有与网络相关的系统调用。
-e trace=signal
跟踪所有与信号相关的系统调用。
-e trace=ipc
跟踪所有与IPC相关的系统调用。
-o 文件名
将跟踪输出写入文件名而不是stderr。
-p pid
使用进程ID pid附加到该进程并开始跟踪。跟踪可以随时通过键盘中断信号(CTRL -C)终止。
-S
按指定条件对-c选项打印的直方图输出进行排序。
示例:打印执行uname系统调用中calls的次数排序
# strace -fc -S calls uname
注:其他参数可以查看man手册
# man strace
使用实践
以“定位一次系统无法解析域名故障”为例
问题现象
无法访问外网域名,提示Name or service not know。
且已检查系统DNS配置文件/etc/resolv.conf正确,排除DNS解析失败。
问题分析
当前无法确定系统在执行 解析域名失败的原因,这时候需要使用strace查看系统调用过程,域名解析通常跟系统读取文件相关,因此我们只查看open file的过程。具体命令如下:
# strace -e strace=open ping www.baidu.com
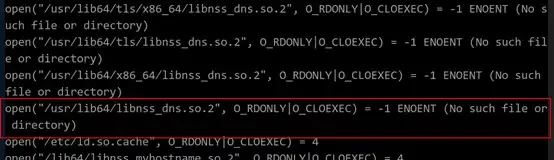
如上图所示在系统调用过程中出现/usr/lib64/libnss_dns.so.2文件缺失,则问题根因已确定为libnss_dns.so.2系统库文件缺失。
解决方法:
libnss_dns.so.2文件由glibc dev包产生,因此重新安装该包即可,请执行
一、前言
在音频开发中,窗体多半为半透明、圆角窗体,如下为Qt 5.5 VS2013实现半透明方法总结。
二、半透明方法设置
2.1 窗体及子控件都设置为半透明
-
setWindowOpacity(0.8);//参数范围为0-1.0,通过QSlider控件做成透明度控制条 -
无边框设置
setWindowFlags(Qt::FramelessWindowHint); -
窗体圆角设置
setAttribute(Qt::WA_TranslucentBackground);
  通过paintEvent绘制窗体背景色与圆角
  void Widget::paintEvent(QPaintEvent *event)
  {
    QPainter painter(this);
    painter.setRenderHint(QPainter::Antialiasing); // 反锯齿;
    painter.setBrush(QBrush(QColor("#616F76")));  //窗体背景色
    painter.setPen(Qt::transparent);
    QRect rect = this->rect();        //rect为绘制大小
    rect.setWidth(rect.width() - 1);
    rect.setHeight(rect.height() - 1);
    painter.drawRoundedRect(rect, 15, 15);  //15为圆角角度
    //也可用QPainterPath 绘制代替 painter.drawRoundedRect(rect, 15, 15);
    //QPainterPath painterPath;
    //painterPath.addRoundedRect(rect, 15, 15);//15为圆角角度
    //painter.drawPath(painterPath);
    QWidget::paintEvent(event);
  }
2.2、通过图片贴图,设置局部透明
- 窗体设置
setAttribute(Qt::WA_TranslucentBackground);//背景半透明属性设置
setWindowFlags(Qt::FramelessWindowHint);//无边框窗体设置
- 采用样式加载图片
ui->m_BgWidget->setStyleSheet("background-image:url(:/images/bg.png);");
注意:m_BgWidget为窗体对象的子窗体,不能直接设置QWidget
- 效果图如下
2.3 通过paintEvent重绘背景色透明度
- 窗体属性设置
setAttribute(Qt::WA_TranslucentBackground);//背景半透明属性设置
  setWindowFlags(Qt::FramelessWindowHint);//无边框窗体设置
  m_BgColor = QColor("#616F76");//默认背景色
  m_BgColor.setAlphaF(0.8);
  this->setContextMenuPolicy(Qt::CustomContextMenu);
  connect(this, SIGNAL(customContextMenuRequested(const QPoint &)),
      this, SLOT(showContextMenuSlot(const QPoint &)));//右击出现菜单
- 右击出现菜单
void Widget::showContextMenuSlot(const QPoint &pos)
  {
    QAction *act = NULL;
    if(NULL == m_Menu)
    {
      m_Menu = new QMenu();//菜单
      m_Actions.clear();//记录所有Action
      act = m_Menu->addAction("1.0", this, SLOT(funcSlot()));
      m_Actions << act;
      act->setCheckable(true);
      act = m_Menu->addAction("0.8", this, SLOT(funcSlot()));
      m_Actions << act;
      act->setCheckable(true);  //设置可选中
      act->setChecked(true);  //设置被选中
      act = m_Menu->addAction("0.5", this, SLOT(funcSlot()));
      m_Actions << act;
      act->setCheckable(true);
      act = m_Menu->addAction("0.3", this, SLOT(funcSlot()));
      m_Actions << act;
      act->setCheckable(true);
      act = m_Menu->addAction("0.1", this, SLOT(funcSlot()));
      m_Actions << act;
      act->setCheckable(true);
    }
    m_Menu->exec(mapToGlobal(pos));//弹出菜单
  }
- 选择菜单Action,修改背景颜色透明度
void Widget::funcSlot()
  {
    QAction *act = qobject_cast<QAction *>(sender());//获取选中的Action
    if(act)
    {
      double alpha = act->text().toDouble();
      m_BgColor.setAlphaF(alpha);//背景色透明度修改
      foreach(QAction *action, m_Actions)//去除其余选中,互斥
      {
        if(act != action)
          action->setChecked(false);
      }
      this->update();//刷新界面
    }
  }
- 通过paintEvent重绘背景色
void Widget::paintEvent(QPaintEvent *event)
  {
    QPainter painter(this);
    painter.setRenderHint(QPainter::Antialiasing); // 反锯齿;
    painter.setBrush(QBrush(m_BgColor));//修改后的背景色
    painter.setPen(Qt::transparent);
    QRect rect = this->rect();      //rect为绘制窗体大小
    rect.setWidth(rect.width() - 1);
    rect.setHeight(rect.height() - 1);
    painter.drawRoundedRect(rect, 15, 15);//15为圆角角度
    //也可用QPainterPath 绘制代替 painter.drawRoundedRect(rect, 15, 15);
    //QPainterPath painterPath;
    //painterPath.addRoundedRect(rect, 15, 15);
    //painter.drawPath(painterPath);
    QWidget::paintEvent(event);
  }
-
效果如下

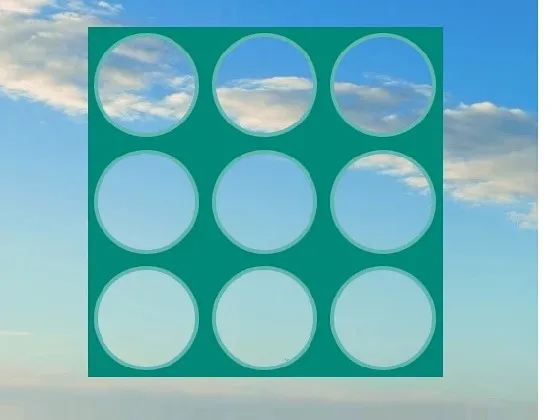
2.4 通过paintEvent采用Clear模式绘图,实现局部透明
- 窗体属性设置
m_Margin = 60;//各个绘制图形与边框的距离
  m_BgColor = QColor("#00BFFF");//窗体背景色
  installEventFilter(this);//事件过滤器,用于鼠标按下后界面移动
  setWindowFlags(Qt::FramelessWindowHint);//无边框窗体设置
  setAttribute(Qt::WA_TranslucentBackground);//背景半透明属性设置
- 画笔属性设置
void Widget::paintEvent(QPaintEvent *)
  {
    QPainter painter(this);
    painter.setPen(Qt::NoPen);
    painter.setBrush(m_BgColor);
    painter.drawRoundedRect(this->rect(), 15, 15);//设置整体窗体圆角为15°
    painter.setCompositionMode(QPainter::CompositionMode_Clear);//设置Clear绘图模式
    //绘制三角形
    drawTriangle(&painter);
    //绘制圆
    drawCircular(&painter);
    //绘制矩形
    drawRectangle(&painter);
  }
- 绘制三角形
void Widget::drawTriangle(QPainter *painter)
  {
    QPainterPath path;
    int width = this->width() / 2;
    int height = this->height() / 2;
    //顶点
    int topX = width / 2;
    int topY = m_Margin;
    //左下顶点
    int leftX = m_Margin;
    int leftY = height - m_Margin;
    //右下顶点
    int rightX = width - m_Margin;
    int rightY = height - m_Margin;
    path.moveTo(topX, topY);//起点
    path.lineTo(leftX, leftY);//画线段1
    path.lineTo(rightX, rightY);//画线段2
    path.lineTo(topX, topY);//画线段3
    painter->fillPath(path, QBrush(m_BgColor));//绘制三角形
  }
- 绘制圆
void Widget::drawCircular(QPainter *painter)
  {
    int width = this->width() / 2;
    int height = this->height() / 2;
    int x = width + width / 2;//X向坐标
    int y = height / 2; //Y向坐标
    int r = width / 2 - m_Margin;
    //第一个参数为中心点,r为x向、y向长度(不一致时可绘制椭圆)
    painter->drawEllipse(QPoint(x, y), r, r);
  }
- 绘制矩形
void Widget::drawRectangle(QPainter *painter)
  {
    int width = this->width() / 2;
    int height = this->height() / 2;
    int rectWidth = width - 2 * m_Margin;//矩形宽度
    int rectHeight = height - 2 * m_Margin;//矩形高度
    int rectX = width - rectWidth / 2;//矩形X向长度
    int rectY = height + m_Margin;//矩形Y向长度
    painter->drawRect(QRect(rectX, rectY, rectWidth, rectHeight));
  }
-
运行效果
一:重写QSplashScreen
#include <QSplashScreen>
#include <QMouseEvent>
class AppSplashScreen : public QSplashScreen
{
    Q_OBJECT
public:
    explicit AppSplashScreen(QPixmap pixmap);
    ~AppSplashScreen();

    void mousePressEvent(QMouseEvent *event);
};

AppSplashScreen::AppSplashScreen(QPixmap pixmap) : QSplashScreen(pixmap)
{
	this->setAttribute(Qt::WA_TransparentForMouseEvents, false);
	this->setWindowFlags(Qt::FramelessWindowHint);
	this->setAttribute(Qt::WA_TranslucentBackground);
}

/* 重写mousePressEvent */
void AppSplashScreen::mousePressEvent(QMouseEvent *event)
{
	return;
}

AppSplashScreen::~AppSplashScreen()
{

}
- 重写mousePressEvent 为了屏蔽鼠标点击事件
- 设置窗口属性:
  this->setAttribute(Qt::WA_TransparentForMouseEvents, false); 设置禁止鼠标事件到父窗口
  this->setWindowFlags(Qt::FramelessWindowHint); 设置窗口无边框
  this->setAttribute(Qt::WA_TranslucentBackground); 设置窗口透明
二:初始化splash
/**
 * @brief 在应用启动过程中附上gif作为开启动画
 */
void MainWindow::InitSplash(void)
{
	int width,height;
	setFixedSize(800, 460);

	splash = new AppSplashScreen(QPixmap(":/png/png/splash.gif").scaled(width, height));
	label = new QLabel(splash);
	mv = new QMovie(":/png/png/splash.gif");

	bool istablet = QGSettings("org.ukui.SettingsDaemon.plugins.tablet-mode").get("tablet-mode").toBool();
	if(istablet == true){
		width = QGuiApplication::primaryScreen()->geometry().width();
		height = QGuiApplication::primaryScreen()->geometry().height();
	}else{
		width = this->width();
		height = this->height();
	}
	splash->setFixedSize(width,height);
	label->setFixedSize(QSize(width , height));
	mv->setScaledSize(label->size());
	QScreen *screen = QGuiApplication::primaryScreen();
	splash->move((screen->geometry().width() - width) / 2,(screen->geometry().height() - height) / 2);

	splash->showMessage(QObject::tr("正在启动程序..."),
				Qt::AlignRight | Qt::AlignTop, Qt::white);

	label->setMovie(mv);
	mv->start();

	if(istablet == true){
		splash->showFullScreen();
	}else{
		splash->show();
	}
	for(int i=0; i<100; i++)
	{
	  qApp->processEvents();
	  QThread::msleep(1);
	}
}
- setFixedSize 设置了父窗体的最大大小和最小大小为 800,460 它相当于设置了setMinimumSize和setMaximumSize都为同一个值
- setScaledSize 将图片缩放大小设置为固定size。也就是这个QLabel的fixedsize
- 为了与应用程序保持一致的位置,需要和应用程序一样,将splash移动到屏幕中间
  QScreen *screen = QGuiApplication::primaryScreen();
  splash->move((screen->geometry().width() - width) / 2,(screen->geometry().height() - height) / 2);
- showMessage 在splash播放的时候,显示文本信息
- 绑定QMovie到QLabel上,并且开始播放gif
  label->setMovie(mv);
  mv->start();
- qApp->processEvents();代表当前的事情不重要,其他线程任务仍继续进行。用于不断刷新splash的事件,从而正常播放gif动画这里故意循环了100次,msleep1,也就意味着,当前至少100ms用于播放动画。然后再继续处理其他事情
- 综合上面代码,initsplash过程中,初始化和播放了一个gif,并且让他默认走了100ms。
三:销毁SplashScreen
/**
 * @brief 销毁new出来的 QMovie QLabel AppSplashScreen
 */
void MainWindow::DestorySplash(void)
{
	splash->finish(this);
	delete mv;
	mv = NULL;
	delete label;
	label = NULL;
	delete splash;
	splash = NULL;
}
四:让动画继续播放
/**
 * @brief 不断设置动画消息
 */
void MainWindow::SplashShowmsg(const QString msg)
{
	label->setMovie(mv);
	mv->start();
	Qt::Alignment topRight = Qt::AlignRight | Qt::AlignTop;
	splash->showMessage(msg,topRight, Qt::white);
	for(int i=0;i<10;i++)
	{
		qApp->processEvents();
		splash->repaint();
	}
}
五:如何调用动画
MainWindow::MainWindow(QStringList str,QWidget *parent)
    :QWidget(parent)
{
        mainWid = new QWidget();
	InitSplash();
        /* 主界面做其他事情 */
        mainWid->show();
	DestorySplash();
}
总结:
上面描述了如何设置一个QSplashScreen,从而让你的程序开启时出现动画效果。但对于效率来说,它为了绘制动画做了很多不必要的sleep和repaint/show。
一、使用惯例
1.1 使用QTimer实例实现可重复定时器
#include <QTimer>
#include <QCoreApplication>
#include <QDebug>

int main(int argc, char** argv) {
    QCoreApplication app(argc, argv); //创建事件循环,用于分发QTimerEvent超时事件
    auto timer = new QTimer; //新建定时器
    //以QT信号-槽方式设置超时回调函数,这里槽的为lambda函数
    QObject::connect(timer, &QTimer::timeout, [timer] () {
        static int cnt = 0; //定时器重复次数
        cnt++;
        qDebug() << "当前定时器超时/重复时间(豪秒):" << timer->interval();
        if(cnt > 4) timer->stop(); //停止计时器
    });
    timer->start(1000); //启动定时器,超时时间1000毫秒
    return app.exec(); //进入事件循环,分发处理超时事件
}
1.2 使用QTimer::singleShot实现一次性定时器
#include <QTimer>
#include <QCoreApplication>
#include <QDebug>

int main(int argc, char** argv) {
    QCoreApplication app(argc, argv); //创建事件循环
    //创建一次性定时器,超时时间2000毫秒,并指定超时回调函数(lambda匿名函数)
    QTimer::singleShot(2000,  [](){
        qDebug() << "SingleTimer timeout!!";
    });
    app.exec(); //进入事件循环
    return 0;
}
二、QTimer注意事项
2.1 只能在QTimer所属线程中启动(thread() == QThread::currentThread())
2.2 在启动时QTimer所属线程必须具备事件循环(d->threadData->hasEventDispatcher())
主线程:在构建QCoreApplication对象之后
副线程:执行QThread::start完并进入run函数之后(此时线程才真正创建完成)
2.3 QTimer所属线程进入事件循环后才能触发超时信号。
主线程:执行QCoreApplication::exec
副线程:执行QThread::exec
三、 QTimer基本原理
借助QTimerEvent事件实现,当启动(QTimer::start)一个定时器时Qt调用底层操作系统接口注册一个定时器给当前线程,当线程接收到超时信号时会构造一个QTimerEvent事件发送会给QTimer对象,QTimer接收到该事件后会调用QObject::timerEvent函数,QTimer类通过覆盖(override)该虚函数,触发QTimer::timeout信号。
四、QTimer实现源码
https://code.woboq.org/qt5/qtbase/src/corelib/kernel/qtimer.cpp.html
一、工具简介
Qt 提供了一个打包工具,叫做 deployqt,可以将应用程序所依赖的库文件都提取出来。在 Windows 系统叫 windeployqt,在 Linux 系统叫 linuxdeployqt,在 Mac 下叫 macdeployqt。
二、linuxdeployqt 源码下载与编译
2.1 源码下载地址 :
git clone https://github.com/probonopd/linuxdeployqt.git
2.2 Qt环境:
本工程在172.25.130.130服务器chroot环境下,Qt环境是配好的,因此这里不需要配置Qt的环境变量。

2.3 安装patchelf
sudo apt install patchelf
该工具的作用:patchelf是一个用于修改ELF(可执行和链接格式)二进制文件的工具。它可以更改二进制文件中的符号表、动态段、程序头等部分,以便在运行时重新定位或修改它们。这对于动态库加载、插件系统和其他需要自定义运行时行为的场景非常有用。
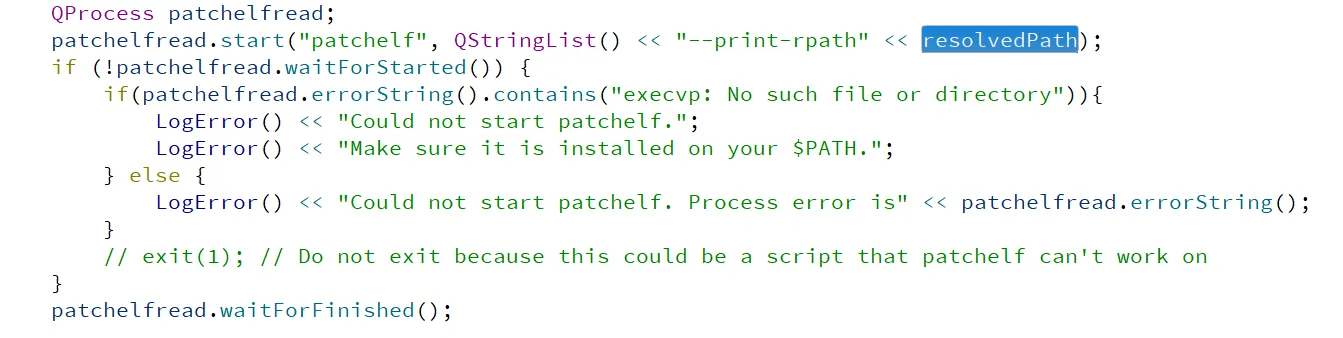
工程中使用如下:
2.4 源码编译:
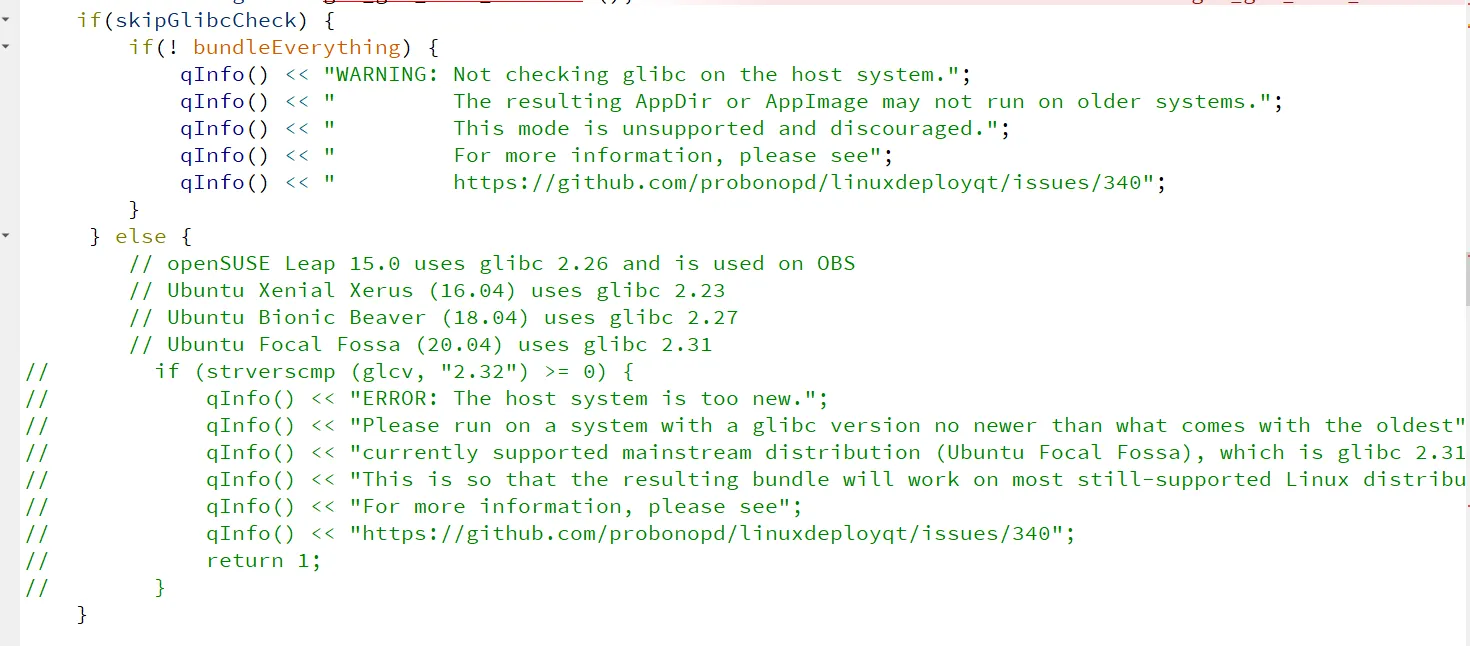
linuxdeployqt/main.cpp 去掉glibc判断
- linuxdeployqt/share.cpp中修改变量copyCopyrightFiles 默认值为false
- bool copyCopyrightFiles = false;//不拷贝版权文件
进入工程目录下:

因为这是qt工程,我们可以qmake 生成makefile 文件 ,再make编译(网上有使用cmake教程,其实大可不必)
编译有报错:
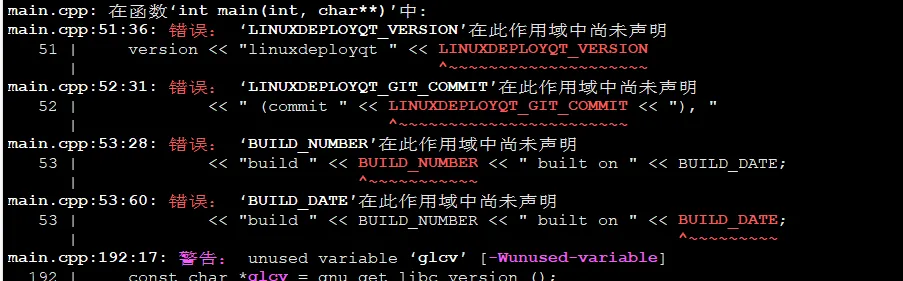
可以把这些打印全注掉,make clean&& make。
编译完成,把这个可执行文件扔进/usr/local/bin目录,这样,我们就可以在其他目录访问了。
通过命令查看可执行程序的信息:
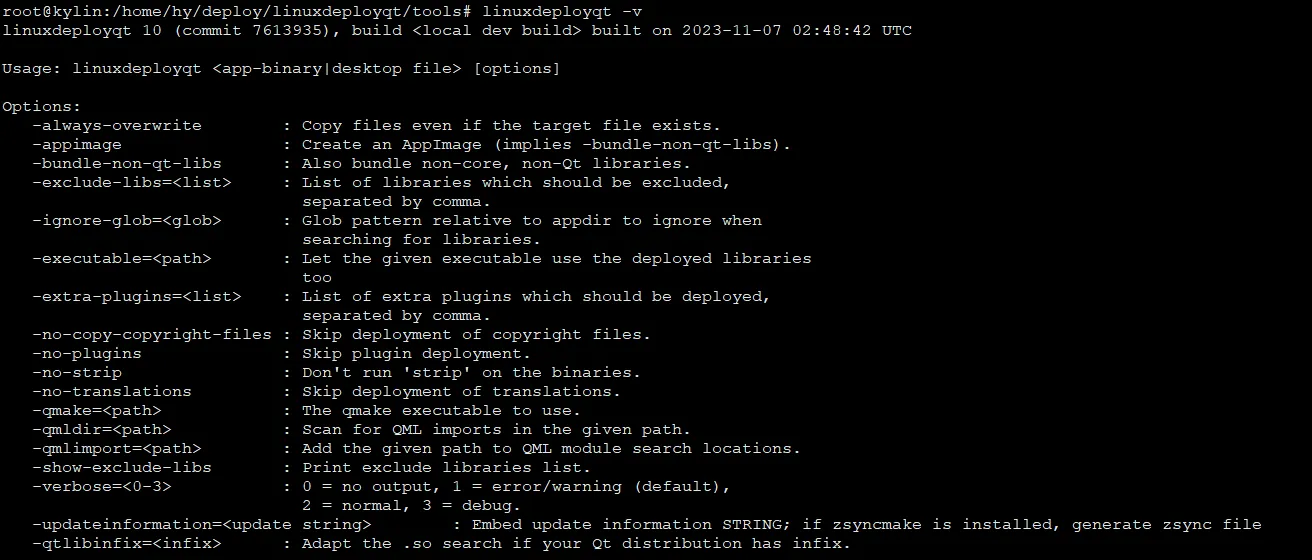
2.5 工具的使用:
在需要打包的文件夹下执行 linuxdeployqt xxx(应用程序名)-bundle-non-qt-libs即可。
三、制作成deb包
这里可以参考新人文档如何使用编译deb包。
